Data import
The import enables you to link any configurator to Retail Operations.
The usage of the feature is subject to prior agreement in your contract. Please contact your sales representative for more information.
The import provides you with a standard import format and APIs in order to enable you to develop an interface between your configurator and Retail Ops.
We provide ways to support both Web and Desktop configurators.
Here is a high level view of the interaction between your interface and Retail Ops:
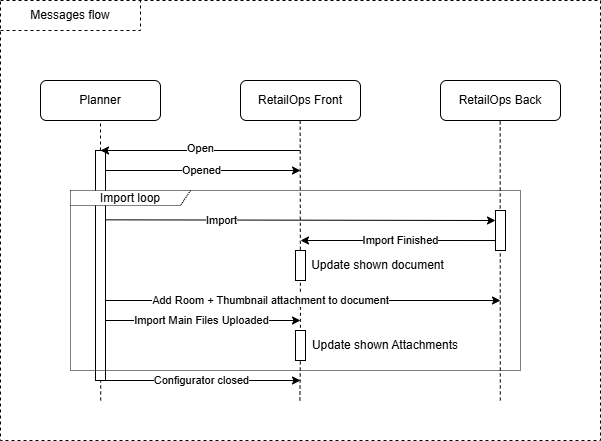
Retail Ops is responsible of asking you to open a configurator anytime a user asks to launch it.
Then while the user is using the configurator you are responsible of doing the import process once or multiple times.
Finally when the user closes the configurator you should notify Retail Ops of the fact that the configurator has been closed.
Prerequisite
You need a Retail Ops ExternalAPI user. If you already own one, you should use it.
What we will give you:
- The ExternalApplicationID for your application.
What you should give us:
- If your configurateur is desktop or web.
- If it's a Web configurateur, it's url.
- An optional JSON config that will be passed to you, as is, in the OpenConfigurator event.
Opening process
The opening event contains all the information needed to launch your configurator and be able to import in the correct document.
Desktop
For desktop applications, we will open an url with a custom protocol: rtopsplanner:
Your application is responsible of registering this protocol to your linker application on Windows.
We will pass the OpenConfigurator event in the url.
Web
For web applications, we will open an iFrame with the url you provided us, and add the OpenConfigurator event in the url.
Import process loop
The import process is divided into 3 parts:
- The BOM import, where we add / update all the document lines from the information present in the provided BOM.
- The Main file(s) upload, where you add / update the main attachments of the document.
- The Additionnal attachments upload, where you upload / update the eventual other attachments (e.g. Perspective, Floor plans, Worktop plans, ...)
BOM Import
This is when Retail Ops imports all the acticles / lines into a document.
In order to process it, you should call the Import Endpoints with the BOM.
Once the BOM has successfully been imported into Retail Ops, the system will automatically reload the currently opened document,
if both the connectionID and configurationSessionID were correctly passed to the Import Endpoints.
Then if the import is successful, you can add / update the Main file(s).
Main file(s) upload
In this Step, you will need to upload the main conception file(s) (see: Attachment Upload). The Main files are potentially 2 files:
- The Configurator project file: the one that may allow you to re-open the related project (mandatory)
- The Main perspective image of the configuration (optional)
The main file must be uploaded with the correct tag: it MUST be assigned the Room tag.
After the upload, you should send the ImportMainFilesUploaded event, in order to ask the front end to refresh its view of the document attachments and import status.
Additional attachments upload
After having fired the Main file(s) uploaded event, you can upload all the other images (see: Attachment Upload).
Tags those attachments with the appropriate tag from the Category 1.
Configurator closing
When your Configurator is about to be closed, you must inform Retail Operations using the CofiguratorClosed event.
Messages
All messages from and to your application use a standard format where the "content" property is completed depending on the event type:
{
    "event": string,
    "content": {
        "configurationSessionID": string,
        "externalApplicationID": int
    }
}
| Parameter | Comment |
|---|---|
| event | The type of event |
| content | The content of the event message |
| content.configurationSessionID | The current ConfigurationSessionID |
| content.externalApplicationID | The ExternalApplicationID we have given you for your application |
Message direction, and how it is passed in the case of a Web or Desktop configurator:
| Message | Direction | Desktop Configurator | Web Configurator | Comment |
|---|---|---|---|---|
| OpenConfigurator | RetailOps -> Configurator | passed as argument ex: rtopsplanner:UGluZ1Bvbmc | passed as "json" parameter ex: https://myConfigurator.com/?json=UGluZ1Bvbmc | /!\ Special encoding |
| ConfiguratorOpened | Configurator -> RetailOps | WebService sendEvent | PostMessage / WebService sendEvent | |
| Import | Configurator -> RetailOps | WebService Import | WebService Import | |
| ImportMainFilesUploaded | Configurator -> RetailOps | WebService sendEvent | PostMessage / WebService sendEvent | |
| ConfiguratorClosed | Configurator -> RetailOps | WebService sendEvent | PostMessage / WebService sendEvent |
Sending events
Via PostMessage
When you want to send an event via PostMessage, just call the PostMessage function with the stringified json event as the message.
Via WebService
To send an event using the WebService, you need to call the Front sendEvent endpoint.
The connectionID is the same as the one given to you in the OpenConfigurator content.connectionID event.
OpenConfigurator
Direction: Retail Ops -> Configurator.
This message is sent to you when the user wants to add a new configuration to a document or edit an existing one:
- For Desktop Configurators, it is passed as the argument (ex: rtopsplanner:UGluZ1Bvbmc)
- For Web Configurators, it is passed as "json" parameter (ex: https://myConfigurator.com/?json=UGluZ1Bvbmc)
This is the only Event with a specific encoding: this message is passed as a Base64UrlEncoded RFC-4648 UTF-8 String.
Base64Url is the same as standard Base64, but with 2 characters replaced:
- "+" -> "-"
- "/" -> "_"
- the padding "=" is optional
So in order to read this message, you should : Base64UrlDecode -> UTF-8 Read -> JSON Parse
{
    "event": "OpenConfigurator",
    "content": {
        "connectionID": string,
        "configurationSessionID": string,
        "externalApplicationID": int,
        "settingID": int,
        "authJWE": string,
        "config": string,
        "action": string, "create|readOnly|edit"
        "companyID": long,
        "userID": long,
        "projectID": long | null,
        "storeID": long,
        "documentTypeID": int,
        "documentID": long,
        "conceptionID": int | null,
        "catalogID": int | null,
        "supplierID": int | null,
        "locale": string,
    }
}
Content detail:
| Parameter | Comment |
|---|---|
| connectionID | The connectionID used to send messages to the correct front instance of RetailOps. Used to call the Send event and Document Import endpoints. |
| configurationSessionID | The configurationSessionID representing the configuration session in RetailOps. Should be passed as is in all the subsequent message linked to the Open event |
| externalApplicationID | The configurator ExternalApplicationID the user wants to open. |
| settingID | This configuration session setting ID should be passed as is in the import bom settingID (optional). Only pass a value in the BOM if given from this message |
| authJWE | JWE token containing the optional user configurator login, encrypted using your external API user key. Can be used in order to know if the open message really comes from Retail Ops, and to prevent replay attacks using the creationDate and the JWE content. |
| config | The config JSON (as string) that you gave us when the external application has been set up. |
| action | The open action. Can be create, readOnly or edit. |
| companyID | CompanyID of the opened document. |
| userID | UserID of the user opening the configurator. |
| projectID | ProjectID of the opened document. |
| storeID | StoreID of the opened document. |
| documentTypeID | DocumentTypeID of the opened document. |
| documentID | DocumentID of the opened document. |
| conceptionID | ConceptionID being opened in the case of readOnly or edit actions.Else will be null or not present. |
| catalogID | CatalogID of the selected catalog, when opening the configurator in create action, using the catalog selector. |
| supplierID | SupplierID of the selected catalog, when opening the configurator in create action, using the catalog selector. |
| locale | The current locale of Retail Ops using ISO code: EN = en-US GB = en-GB FR = fr-FR |
authJWE content
The JWE token contains an UTF-8 encoded json.
The JWE algorithm is A256KW.
The JWE is encrypted using the A256GCM encryption method, using your ExternalAPI user APIKey as the AES key.
It is serialized using the compact mode.
{
    "creationDate": DateTime,
    "login": string | null,
    "password": string | null
}
ConfiguratorOpened
Direction: Configurator -> Retail Ops
You should send this event when the configurator is successfully opened.
{
    "event": "ConfiguratorOpened",
    "content": {
        "configurationSessionID": string,   // same as given in the the OpenConfigurator event
        "externalApplicationID": int        // same as given in the the OpenConfigurator event
    }
}
Import
There is no direct message for the Import. You should call the import Webservice endpoints.
For more detail see Import Process
ImportMainFilesUploaded
Direction: Configurator -> Retail Ops
You should send this event when you have finished uploading the Main file of the project (cf. Mainf file(s) upload).
{
    "event": "ImportMainFilesUploaded",
    "content": {
        "configurationSessionID": string,   // same as given in the the OpenConfigurator event
        "externalApplicationID": int        // same as given in the the OpenConfigurator event
    }
}
ConfiguratorClosed
Direction: Configurator -> Retail Ops
You should send this event when the configurator is closed.
{
    "event": "ConfiguratorClosed",
    "content": {
        "configurationSessionID": string,   // same as given in the the OpenConfigurator event
        "externalApplicationID": int        // same as given in the the OpenConfigurator event
    }
}
Errors
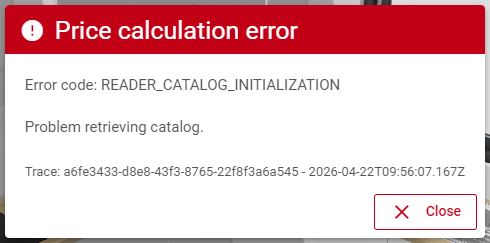
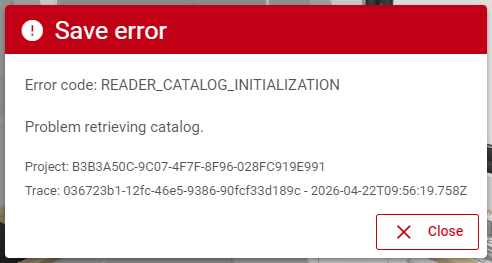
The errorCode value is a simple string that can inform the end-user of some specific known types of errors that may occur during the import.
Error messages
Those errorCode are displayed in an in Retail ops in specific dialogs when the user requests details of the project’s pricing or the details of the products:
Or when the project is validated in the planner:
Error codes
Below are some of the values that may be displayed by the Retail Ops system and which may explain why an import could not be completed:
| Error Code | Description |
|---|---|
| IMPORT_FILE_GENERATION | File generation error. |
| IMPORT_INTERCHANGE_CONFIGURATION_INITIALIZATION | Failed to initialise the Interchange configuration. |
| IMPORT_INTERCHANGE_DRIVER_BUSY | Interchange pilot busy. |
| IMPORT_INTERCHANGE_DRIVER_INITIALIZATION | Failed to initialise the Interchange driver. |
| IMPORT_INTERCHANGE_DRIVER_MISSING | Interchange driver missing or busy. |
| IMPORT_NO_DATA_FILE | Project import error: no data file. |
| IMPORT_UNKNOWN_FILE_FORMAT | Project import error: unknown data file format. |
| READER_CATALOG_INITIALIZATION | Problem retrieving the catalogue. |
| READER_DOCUMENT_INITIALIZATION | Failed to initialise the document list. |
| READER_DOCUMENT_LINE_INITIALIZATION | Problem retrieving lines from the document. |
| WRITER_CREATING_DOCUMENT | Problem creating the document. |
| WRITER_CUSTOM_INITIALIZATIONS | Problem during additional initialisations. |
| WRITER_FINALIZING_IMPORT | Problem finalising the import. |
| WRITER_INITIALIZING_IMPORT | Problem initialising the import. |
| WRITER_MOVE_FILES | Problem creating or deleting the directory. |
| WRITER_NEW_DOCUMENT_LINE_UPDATE | Problem updating the lines in the new document. |
| WRITER_NEW_DOCUMENT_UPDATE_HEADER | Problem updating the header of the new document. |
| WRITER_NEW_DOCUMENT_UPDATE_PRICES | Problem updating the prices in the new document. |
| WRITER_NEW_DOCUMENT_UPDATE_VARIABLES | Problem updating the variables in the new document. |
| WRITER_PRICERS_INIT | Problem initialising the document pricer. |
| WRITER_PRODUCT_IMAGE_PATH_EMPTY | The product image path is empty. |