Document
In the Retail Ops environment, a Document is the entity that allows the end-user to manage a sale or a purchase step during a customer project. Each document of a Project represent a different status of its progress. It can be assigned a list of products, prices, discounts, taxes, additional fees, and in the Retail Ops context is linked to one Project (thus also to one Customer), and some Products (and thus related Catalogs).
Retail operations manages different levels of Documents corresponding with the full cycle of life of a given Customer project, from its creation to its finalization. We keep a copy of each step of this selling process in a specific Document in order to track the important changes in prices, margins, dates, etc.
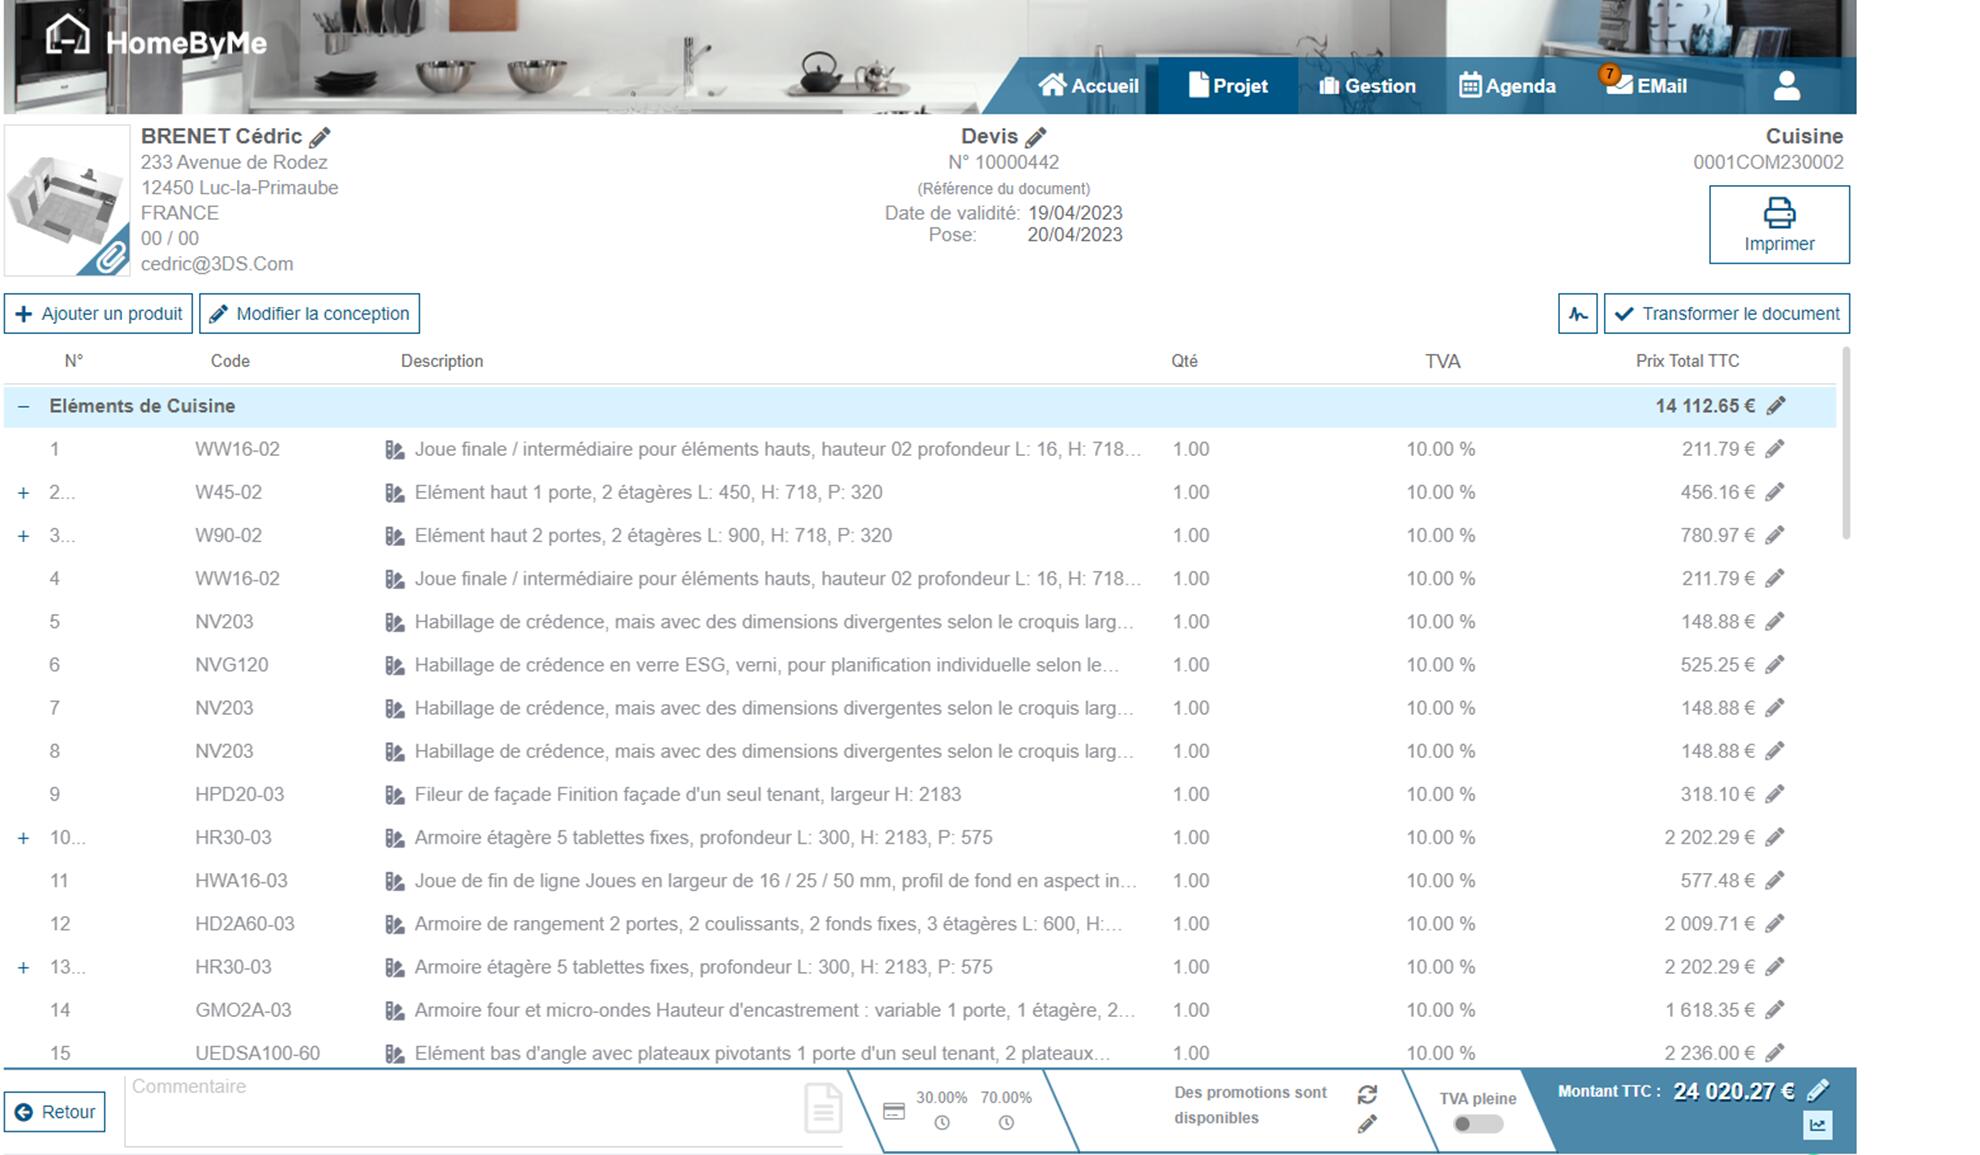
Header
Customer / Supplier
Depending on the kind of Document you're working on (Sales vs Purchase), its related Contact will be a Customer or a Supplier. The details of the Contact related with the current Document can be accessed on the top-left of the document detail page: name, address, phone numbers & email. You can edit this information if nedded.
Attached files
A screen similar to the Project attached files popup can be accessed in order to display the list of files related with the document. This list is automatically fed anytime you process an import from a graphical tool, but you can also add additional files manually.
Main information
Several important pieces of information are displayed directly in the middle of the top screen of the current Document:
- Its Document type as a reminder
- Its Number
- Its Reference (optional)
- Some important dates, depending on the Document type, such as:
- Installation date (for Sales documents)
- Expected reception date (for Purchase documents)
- Validity date (for Quotations)
- Potentially some additional fields depending on the context, such as:
- The Invoice type (for Invoices)
Some of these information may be modified by clicking on the corresponding area, e.g:
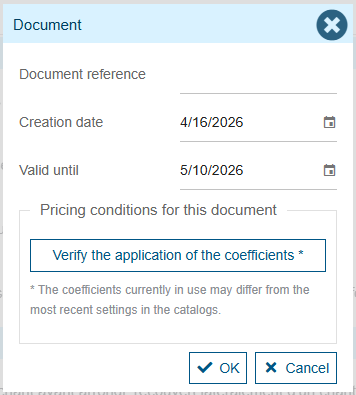
Coefficients application date
In certain conditions (modifiable Estimates or Sales Orders), an additional Verify the application of the coefficients button allows you to check that the Coefficients applied on the Document are up-to-date:
- By default, the price Coefficients that are applied on a Document use application rules that are valid at its creation date, even if you are modifying it a few days after it was created. This guarantees that no eventual new Coefficient rule will automatically change your prices without your agreement.
- In certain cases (e.g. Estimates which validity date has expired), the current date is chosen instead.
- This button allows you to check which prices your Document would be given if using the Coefficient rules that are currently active (i.e. for today).
The button may be hidden if your Document contains lines that were imported from a configurator drawing (cf. Import from a configurator) some time ago. In this case, the system will ask you to re-import your drawings in order to complete the missing data that is required for the Coefficients updating process.
Clicking on this button checks the Coefficients to be applied to each Document line for the new application date and then displays a quick comparative sum-up of your Document final price before and after the eventual coefficient change:
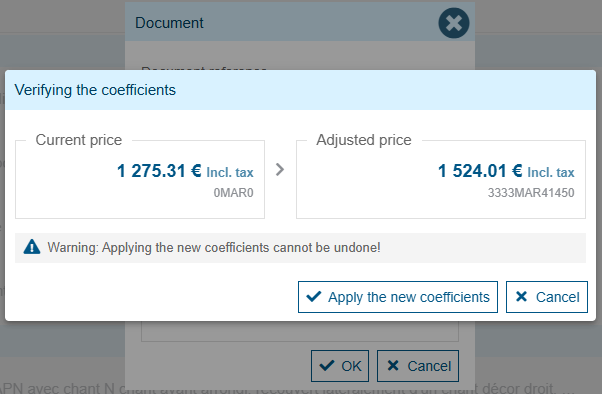
Here you need to decide whether to:
- Keep on using your old coefficients, like shown on the "Current price" left sum-up: just
Cancelthe popup window. - Switch to the new ones, like show on the "Adjusted price" right sum-up: click on the
Apply the new coefficientsbutton, and change your coefficients application date to now.
Please notice that both prices may often be equal, since a change requires new coefficient application rule definitions for your referred Catalogs.
No "reverse" function allows you to go back to your old coefficients application date: deciding to update your coefficients to the current date is not a cancellable procedure.
Project
As a reminder, the main information (code & a name) about the Project related with the current Document is displayed on the top-right of the screen.
Main actions
Add a product
It is possible to create your own catalogs in Retail operations. In this case, products can be added manually from a document via the "add a product" action.
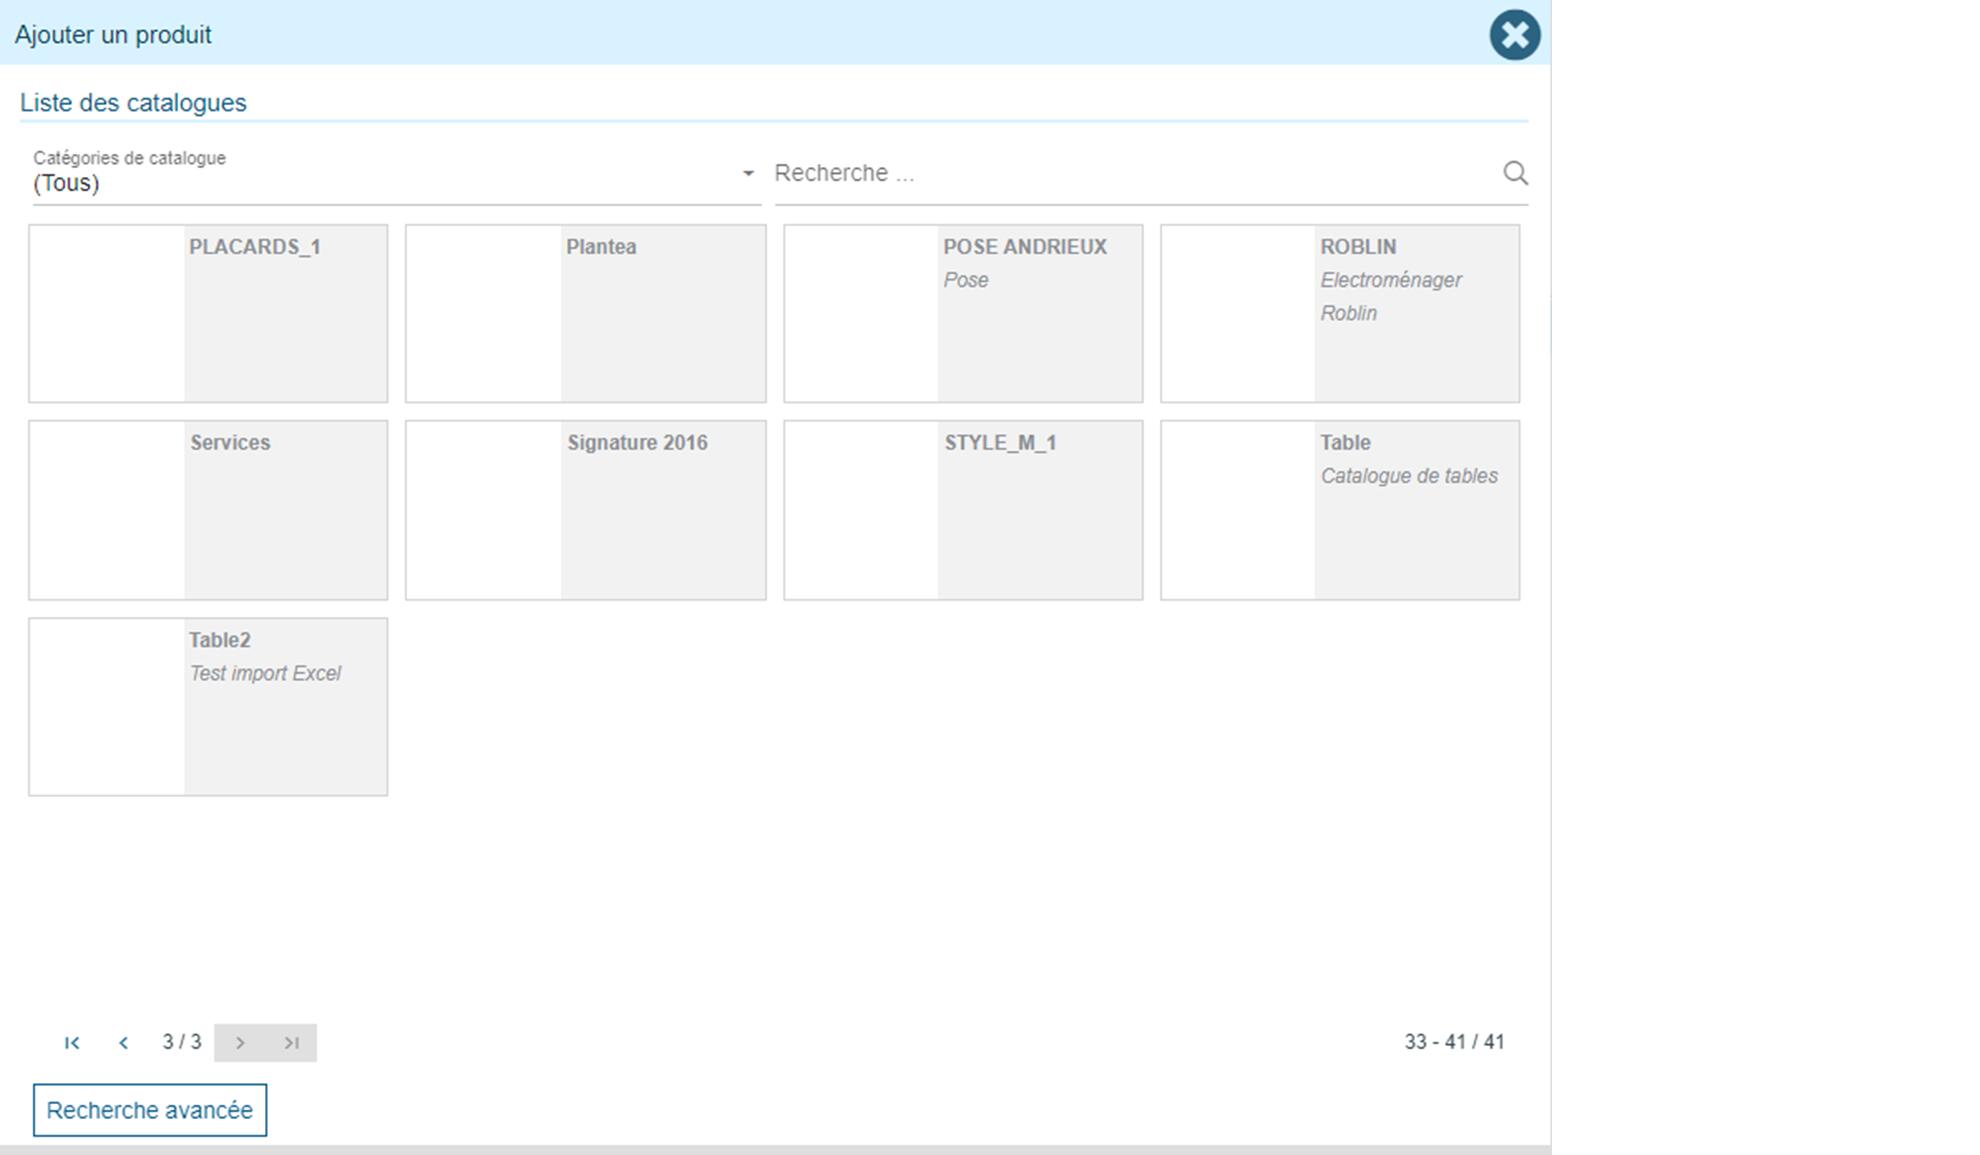
Add Installation/Service products
There's a specific feature allowing the system to compute and propose products to be added to the active document and that correspond to Installation or Service additional costs. Please cf. Installation & Service page for more details about this functionnality.
Import from a configurator
Retail operations offers the ability to start a new drawing from an external configurator or import an existing one. It is compatible with the most common solutions, and of course especially with HomeByMe/KitchenByMe. You can contact your sales representative to check the compatibility with your desired graphical tool.
In case you'd need to link Retail ops with a not-natively-supported graphical configurator, you can also check our generic Data import section, that details the steps to build your own interface.
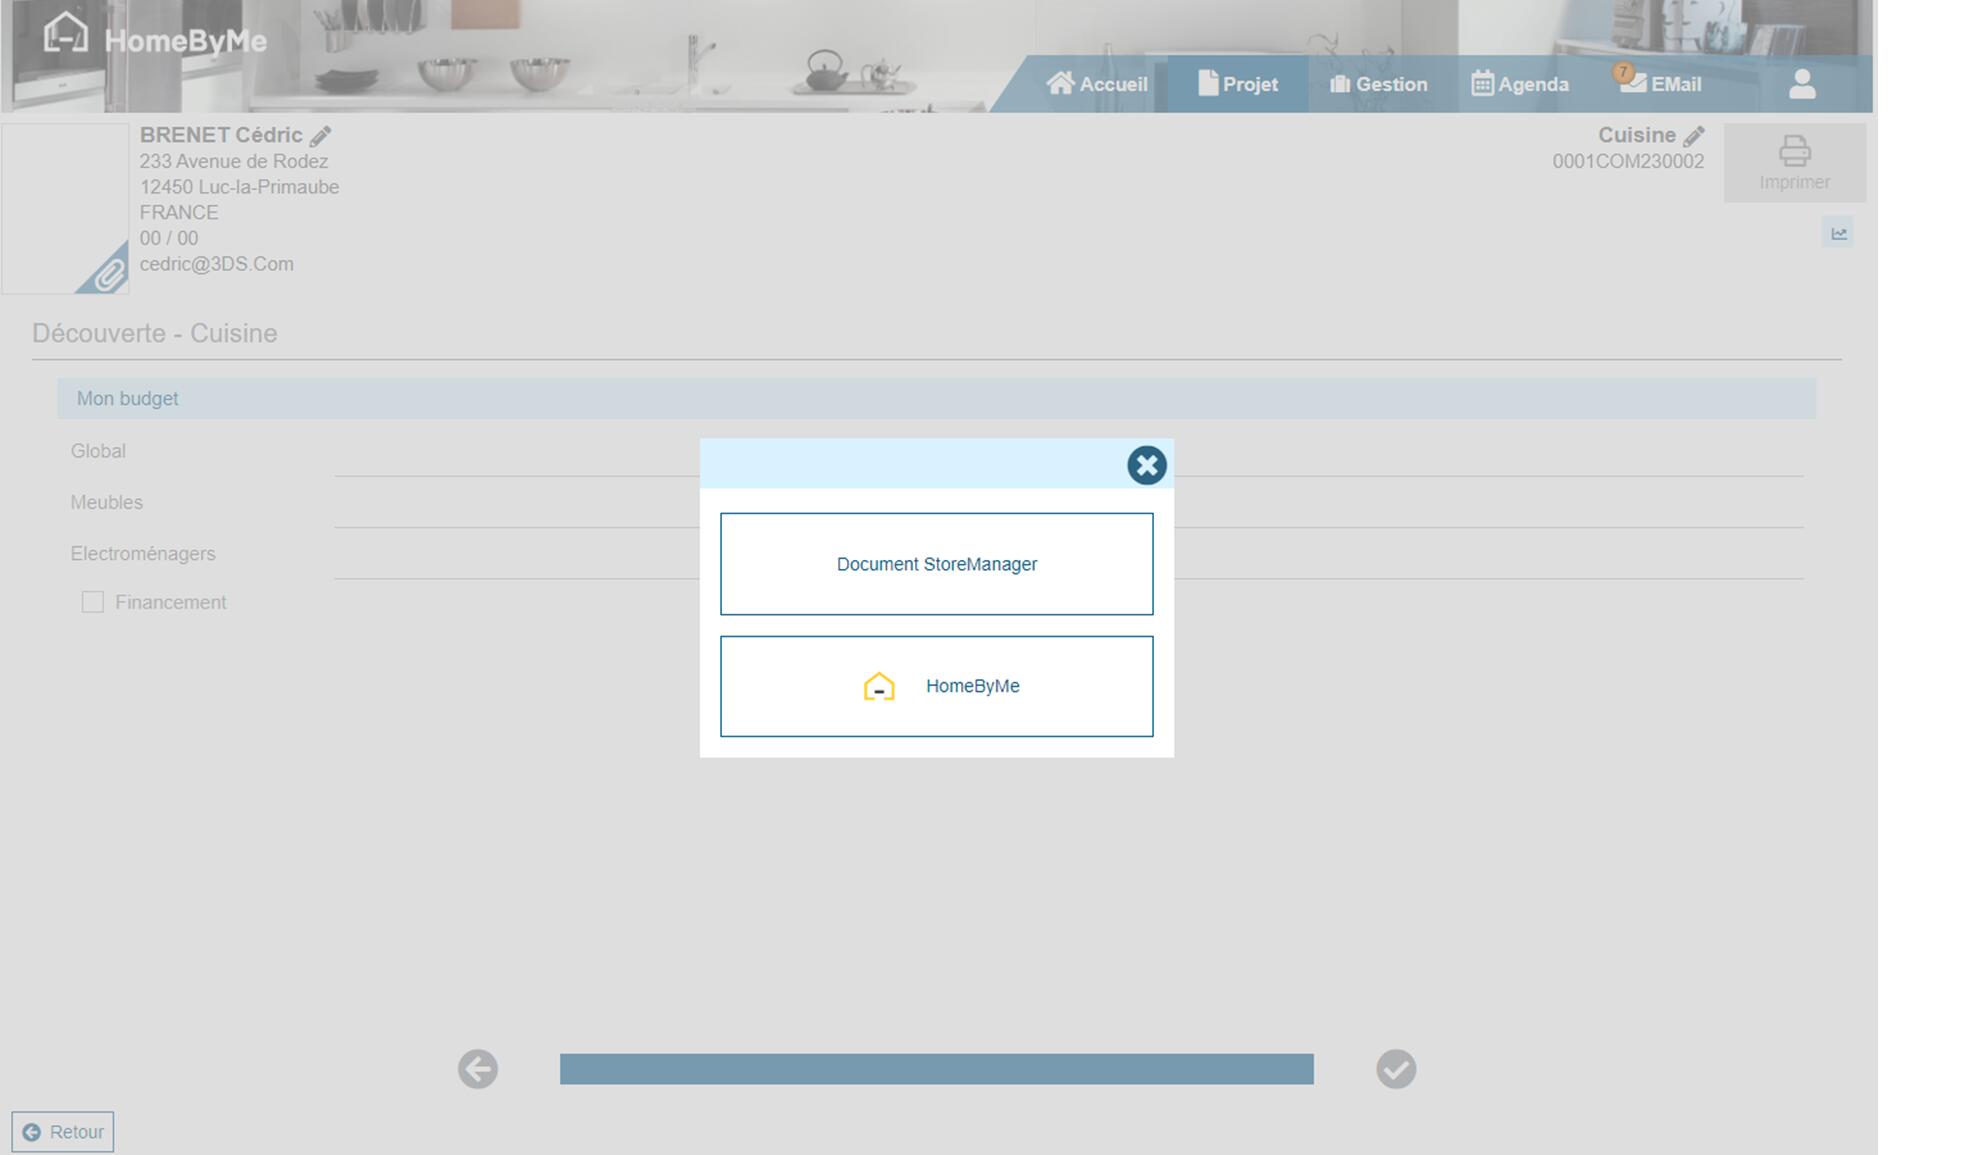
When saving in the design tool, all products with their information are imported into Retail operations. The main information concerns: references, descriptions, prices, taxes and information concerning models and finishes.
When closing the design tool, Retail operations retrieves the product information again and also imports the additional plans (images, PDF, ...) that can be generated by the design tool.
The "Edit design" button will allow the end-user to directly open again a drawing that was previously imported in the active document and potentially apply modifications in order to import them again.
Please note that it is possible to navigate in Retail operations (change menu) while the design tool is open. When saving or closing the tool, Retail operations will automatically return to the document currently being entered.
Import from another document
It is also possible to import document lines from an existing Document. A wizard offers you to select the source project, then the source document, and finally the document lines to be copied into your active document.
Import completed with errors
In the rare case where products contain errors during import, they are still added to the document unconditionally. However, since the data is not valid, Retail operations marks them as erroneous products and prevents certain important actions on the document, such as signing, transforming, or printing.
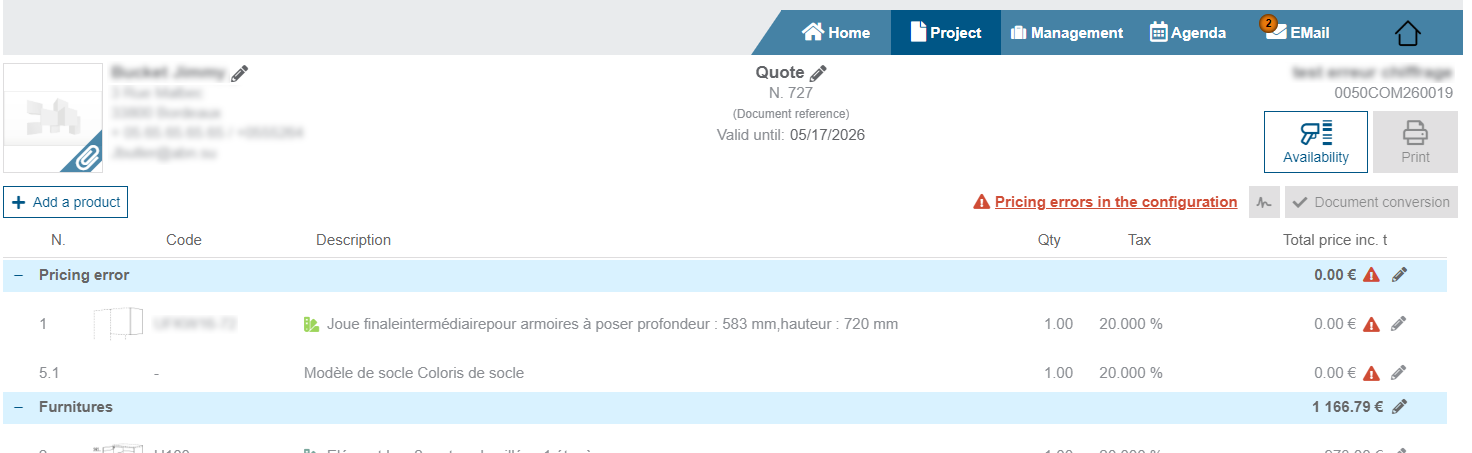
All products with errors are grouped together in a dedicated section, indicated by a red exclamation mark. Clicking on the label provides more information about the project containing the error.
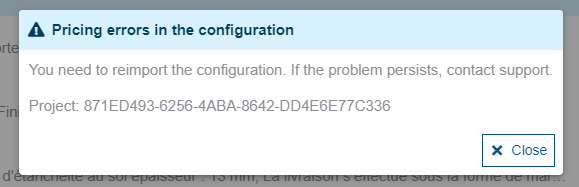
The list of known errors that may be triggered during an import can be found here.
Edit/Save the Document
A "manual save" mode is available for sales documents, excluding accounting documents (invoices, credit notes).
It gives the user the option of validating modifications or reverting to the last saved version of the document.
This mode is activated in the Company administration screen via the DOCUMENT_MANUAL_SAVE configuration parameter.
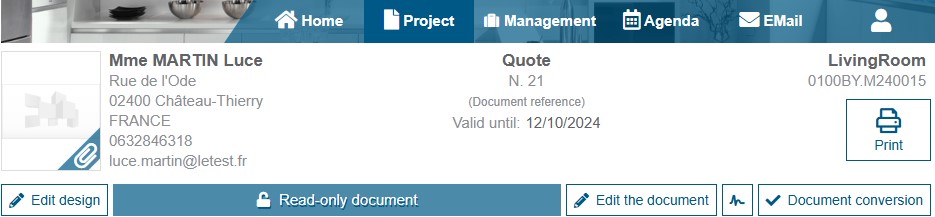
Documents are read-only. Modifications are required to add products, apply discounts, etc...
When the user clicks on the “Modify” button, a new editable version of the document is created. Until this version has been validated, it cannot be printed or transformed.
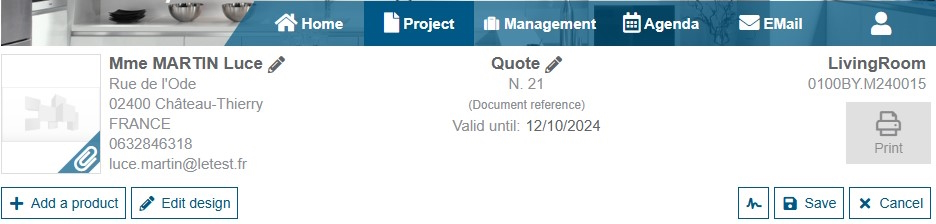
If the version is saved, the document becomes read-only and can be transformed again. The previous version of the document is versioned and no longer visible in the project.
On the other hand, if the changes are cancelled, the version is deleted and the user returns to the previous version of the document.

Users cannot exit a document they are editing. They must cancel or save it.
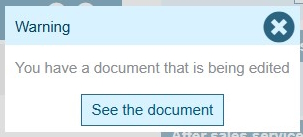
When a project is opened, a pop-up may inform the user if a document is still being modified. This may occur if a user has closed the browser without saving or canceling the document.
By using the pop-up, it is possible to return directly to the document in question.
Sign the Document
Signing a document is a way of confirming and validating its content with your client. This process can be linked to any external system that manages Electronic signature.
A signed document is locked and cannot be modified except if the signing is manually cancelled by a user owning the required access rights. Please note that this action can be sensitive since and must be carried out with great caution.
Transform the document
In Retail operations, we "Transform a document". That is to say, it is possible to create a document from another. For example, the customer purchase order is created by transforming the customer quote into a purchase order. As a result, the customer quote is kept (not modifiable) and the customer purchase order directly contains all the elements validated in the quote
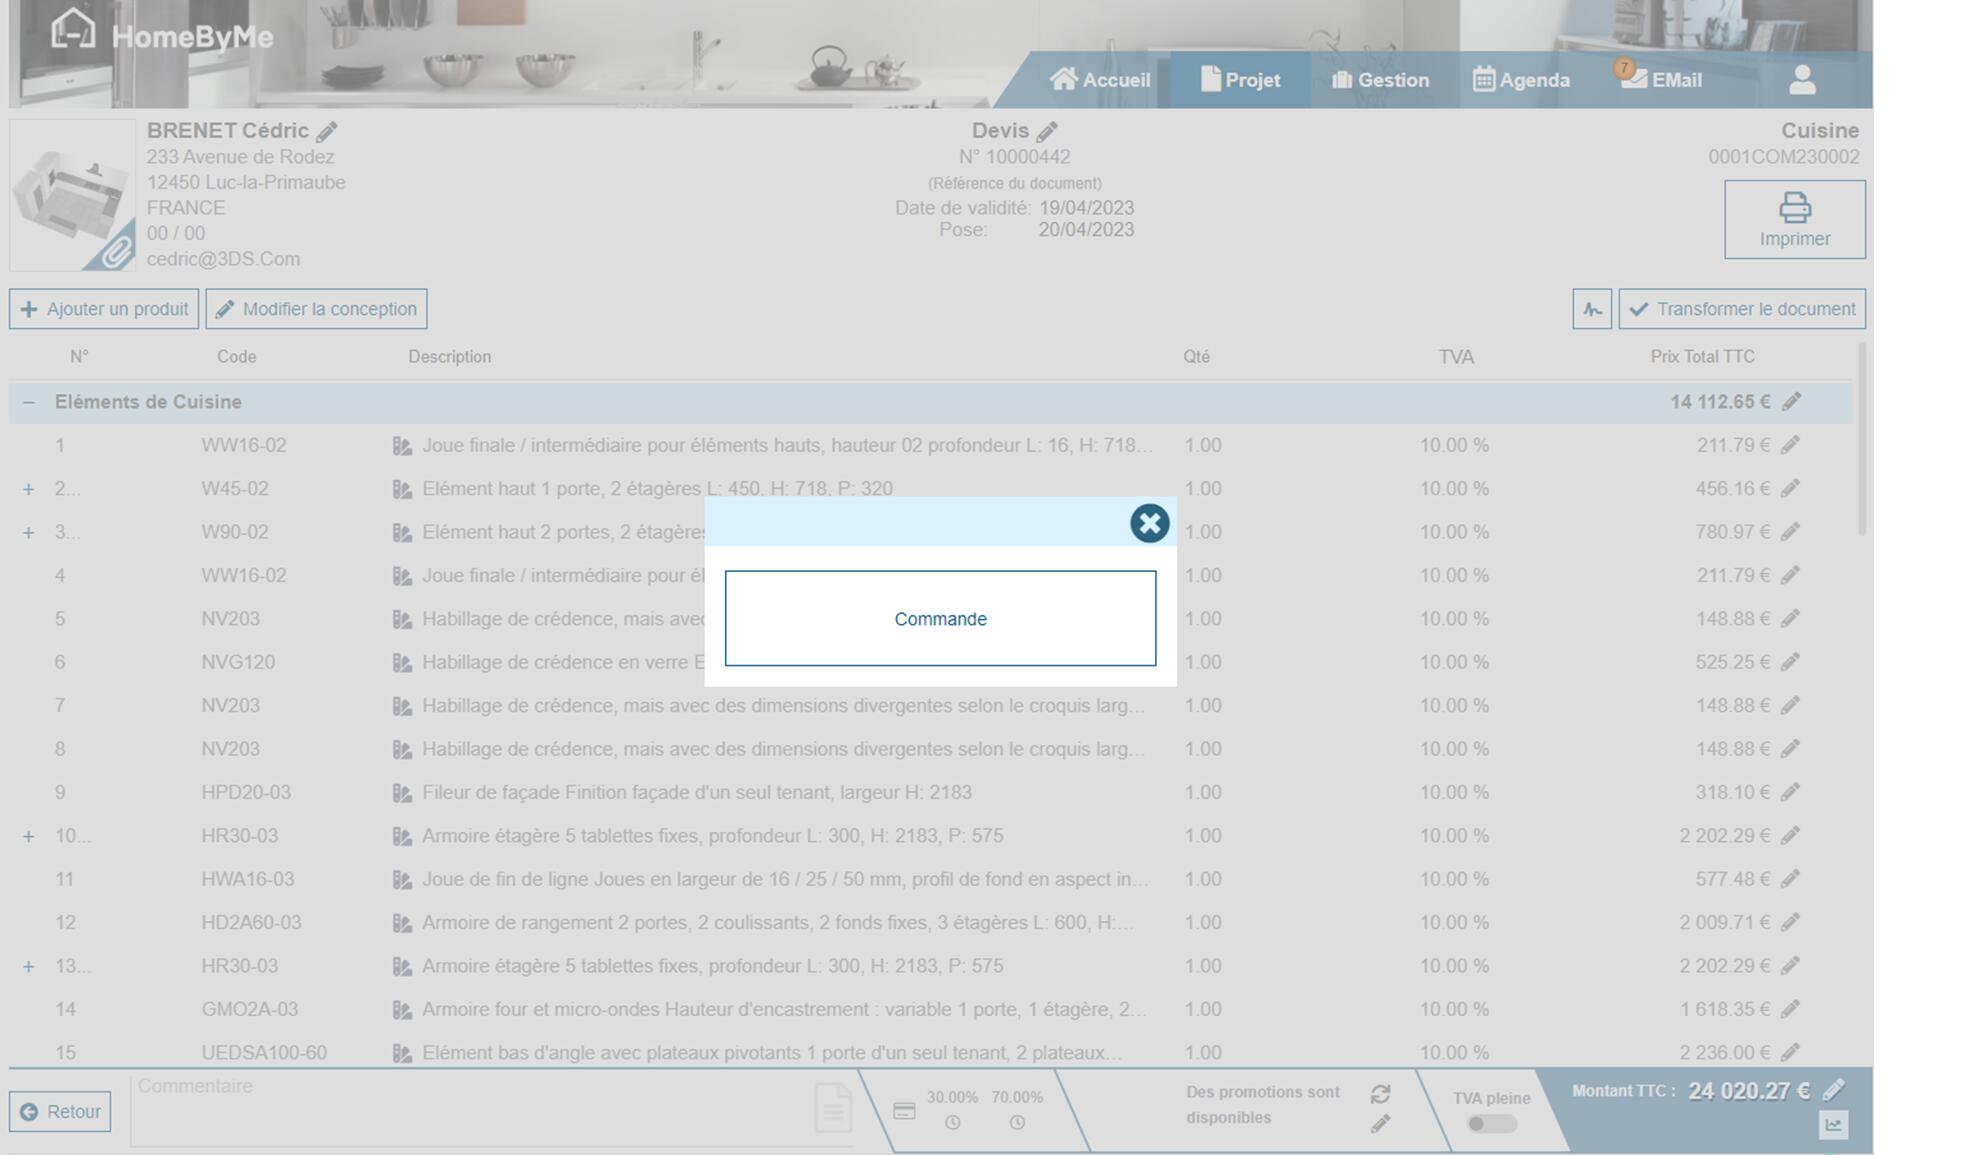
This "Transformation" also has the action of advancing certain stages of the project progress flow. There is also a notion of "Partial Transformation". It is available by default on the transformations of a customer purchase order into a delivery note and between a supplier AR and a receipt note. The transformation action gives the user the choice of making a "global" or "partial" transformation of the document. If he selects "partial", the user will have to select the products that will be transferred to the new document. A special case exists for partial transformations, is that we do not forward payments. For example, if a deposit was taken on the order and you convert it into a partial delivery, the deposit will not be present on the delivery.
It is of course still possible to create a document via a “New document” action without a link to another.
Create supplier purchases
To create supplier purchases, we use the same principle of "Transform the document". From the customer purchase order, we choose to transform the document into "Supplier Purchase". This action displays a screen to preview the purchases that will be created.
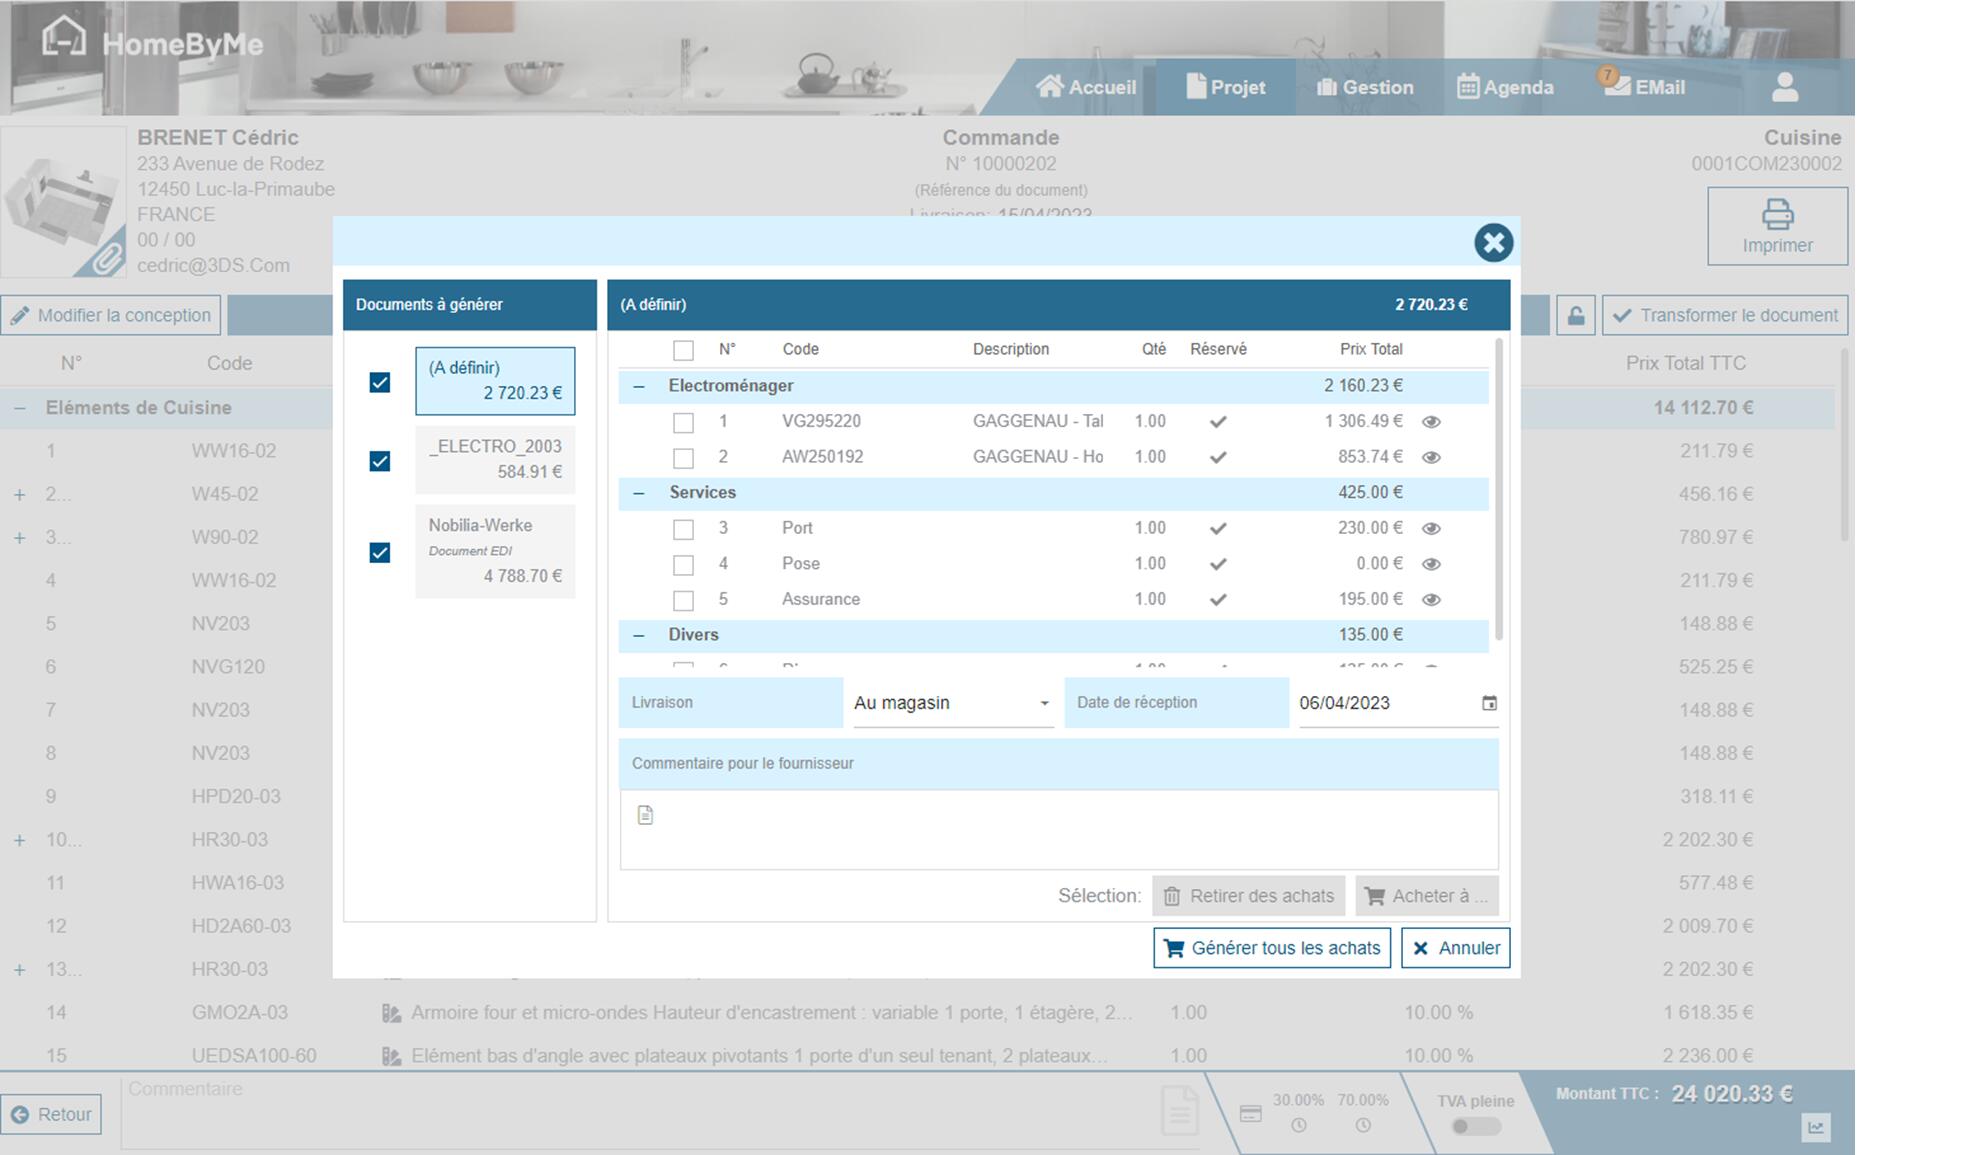
In this screen, the user views the list of products grouped by supplier, determined as follows:
1 - A product is assigned to its default supplier.
2 - If no supplier is found for the product, it is assigned to the default supplier for the catalog.
3 - If no supplier is found for the product, products from an Installation or Service catalog without a default supplier will be assigned to the project installer if there is one.
Then he can confirm or complete the information on the desired delivery location and date as well as add a comment for the supplier. It is also possible to choose to modify the supplier proposed by default as well as to discard a product so as not to purchase it. To create supplier orders, simply validate this screen to create as many orders as there are suppliers. The application then displays all the orders created. It is up to the user to transfer them to the supplier (Example: open the document, print and choose to send it by email).
Print
A "Print" button is available at the top right of the screen. This allows you to view the document before deciding to print it, download it or send it by email.
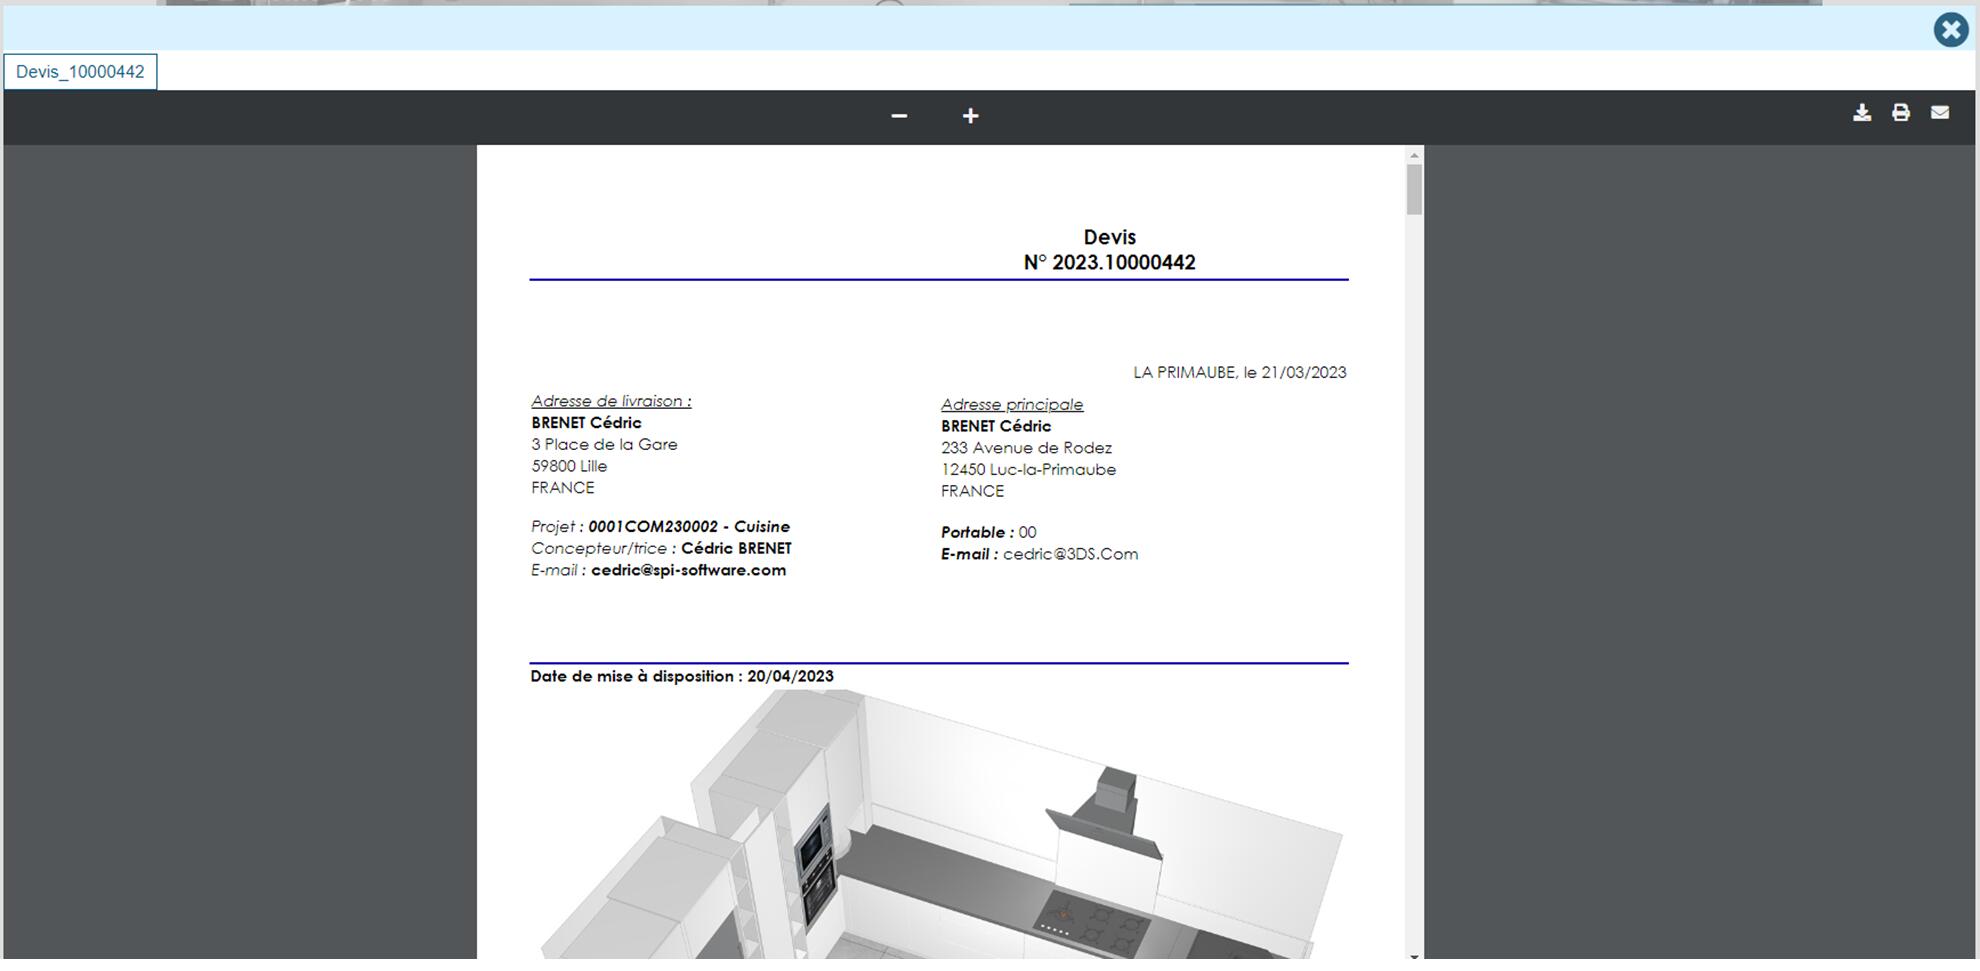
Some settings in your system may cause errors or unexpected behavior when generating editions (e.g. misplaced or missing elements). To avoid any inconvenience, please make sure that:
- Your Internet browser is compatible (cf. Requirements)
- Your browser and system zooms are set to 100%
Supplier Technical Control Tool

To have access to this feature, you must have set up your supplier in EDI and ensure that it's linked to a supplier technical control tool (shown here).
Clicking this button analyzes the suppliers present in the document and - if a control tool is linked - displays a corresponding iframe. The external tool is called and the complete scene definition is sent for technical control by the external system.
When the external tool responds, the returned information is displayed. If no provider is set up, a message will be displayed to let you know.
Document lines
The document lines are grouped by classification and then sorted according their number.
A document line can potentially own sub-lines, that you can display by clicking on the "+" icon on the left of the parent line, or hide again by clicking on the "-" icon:
- When made visible, each document line (parent as children) holds its own amount and VAT rate
- When hidden (i.e. only the parent line is shown), the displayed amount is the sum of all amounts of both the parent line and its sub-lines, and VAT field may list the different VAT rates of the group
Modifying a product
By selecting the "pencil" to the right of a product reference, you can view its details. Depending on the user's rights, you can modify all the information related to this product except its reference.
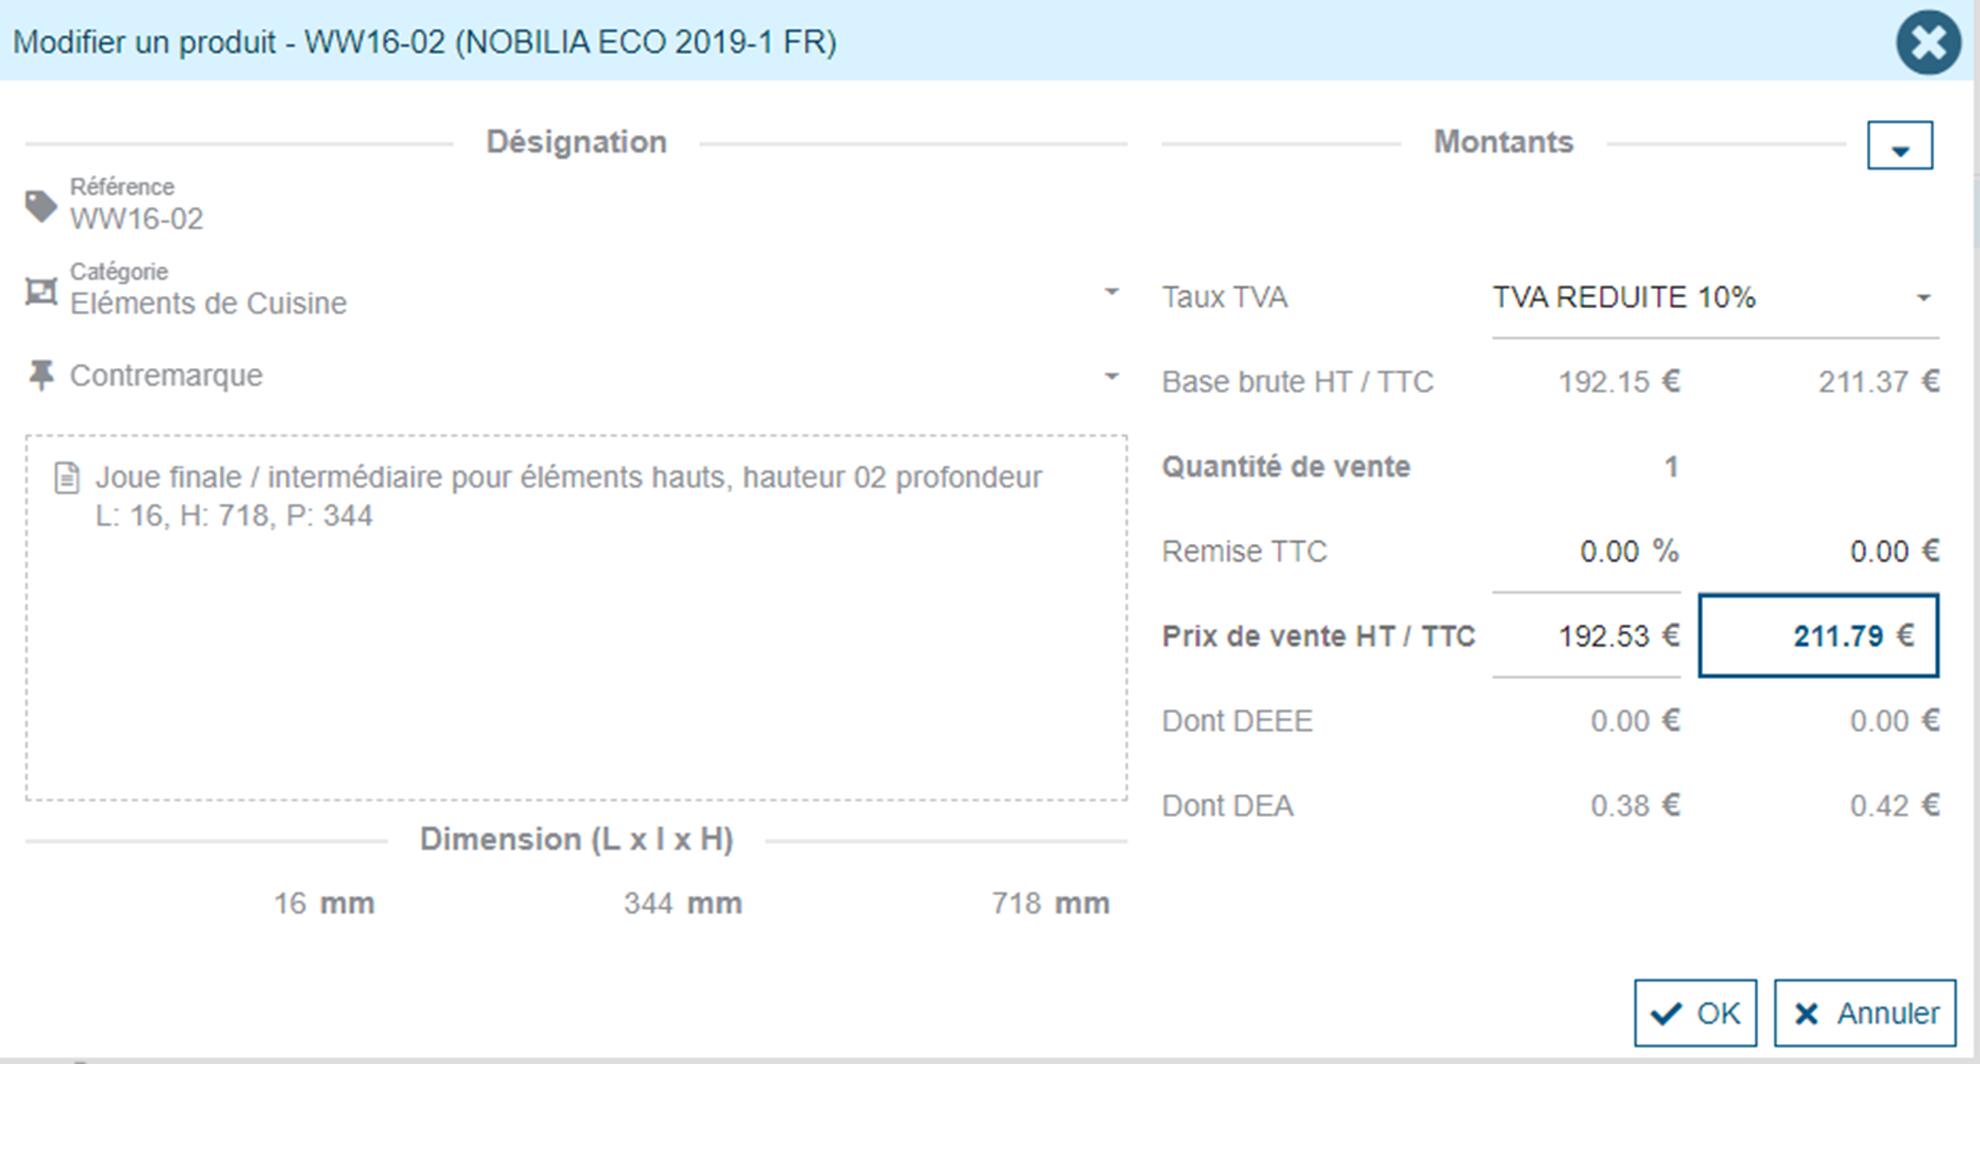
When modifying a line owning sub-lines, 2 different behaviors coexist:
- When the sub-lines are hidden, the modification dialog box allows the end-user to apply modifications on the full group of corresponding lines
- When the sub-lines are visible, the modification dialog box concerns the selected line only
Applying a discount
There are three discount levels in Retail operations: product discount, category discount and document footer discount. Access to discount entry is done according to the desired discount: on the product, on the category, on the document footer.
Style definition
When working with data imported from a Graphical tool, a Style definition indicator may appear on certain Products, just before their description. The color of these indicators may be different when some variations exist between two Document line Style definitions.
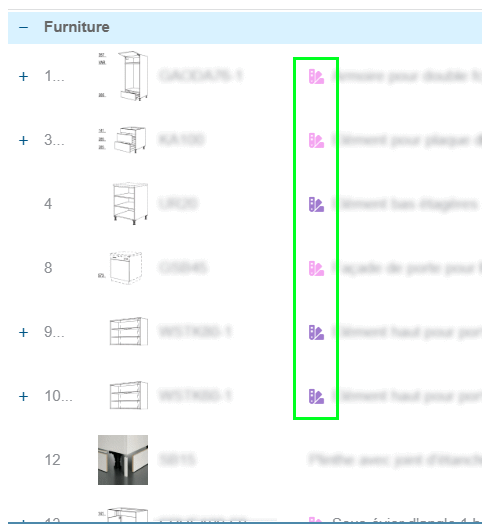
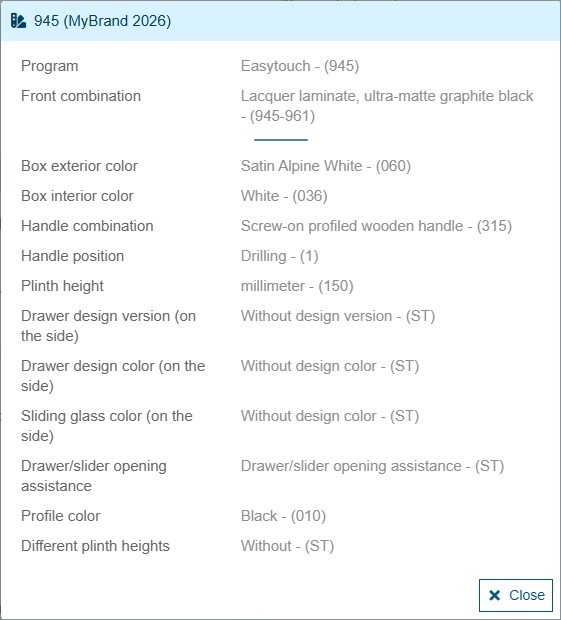
If you click on one of these icons, a dialog will prompt, detailing the full Style definition characteristics of your Document line.
Main style
The "Main style definition" notion can be used in reporting or in Coefficient definitions. It is the Style definition of the document that:
- Is referred by the biggest number of lines (assuming their quantities)
- Then owns the most complete definition (e.g. biggest number of Style features & options)
Footer
Comment
At the bottom of the document, it is possible to add a comment for the customer. This comment will be printed on the documents given to the customer:
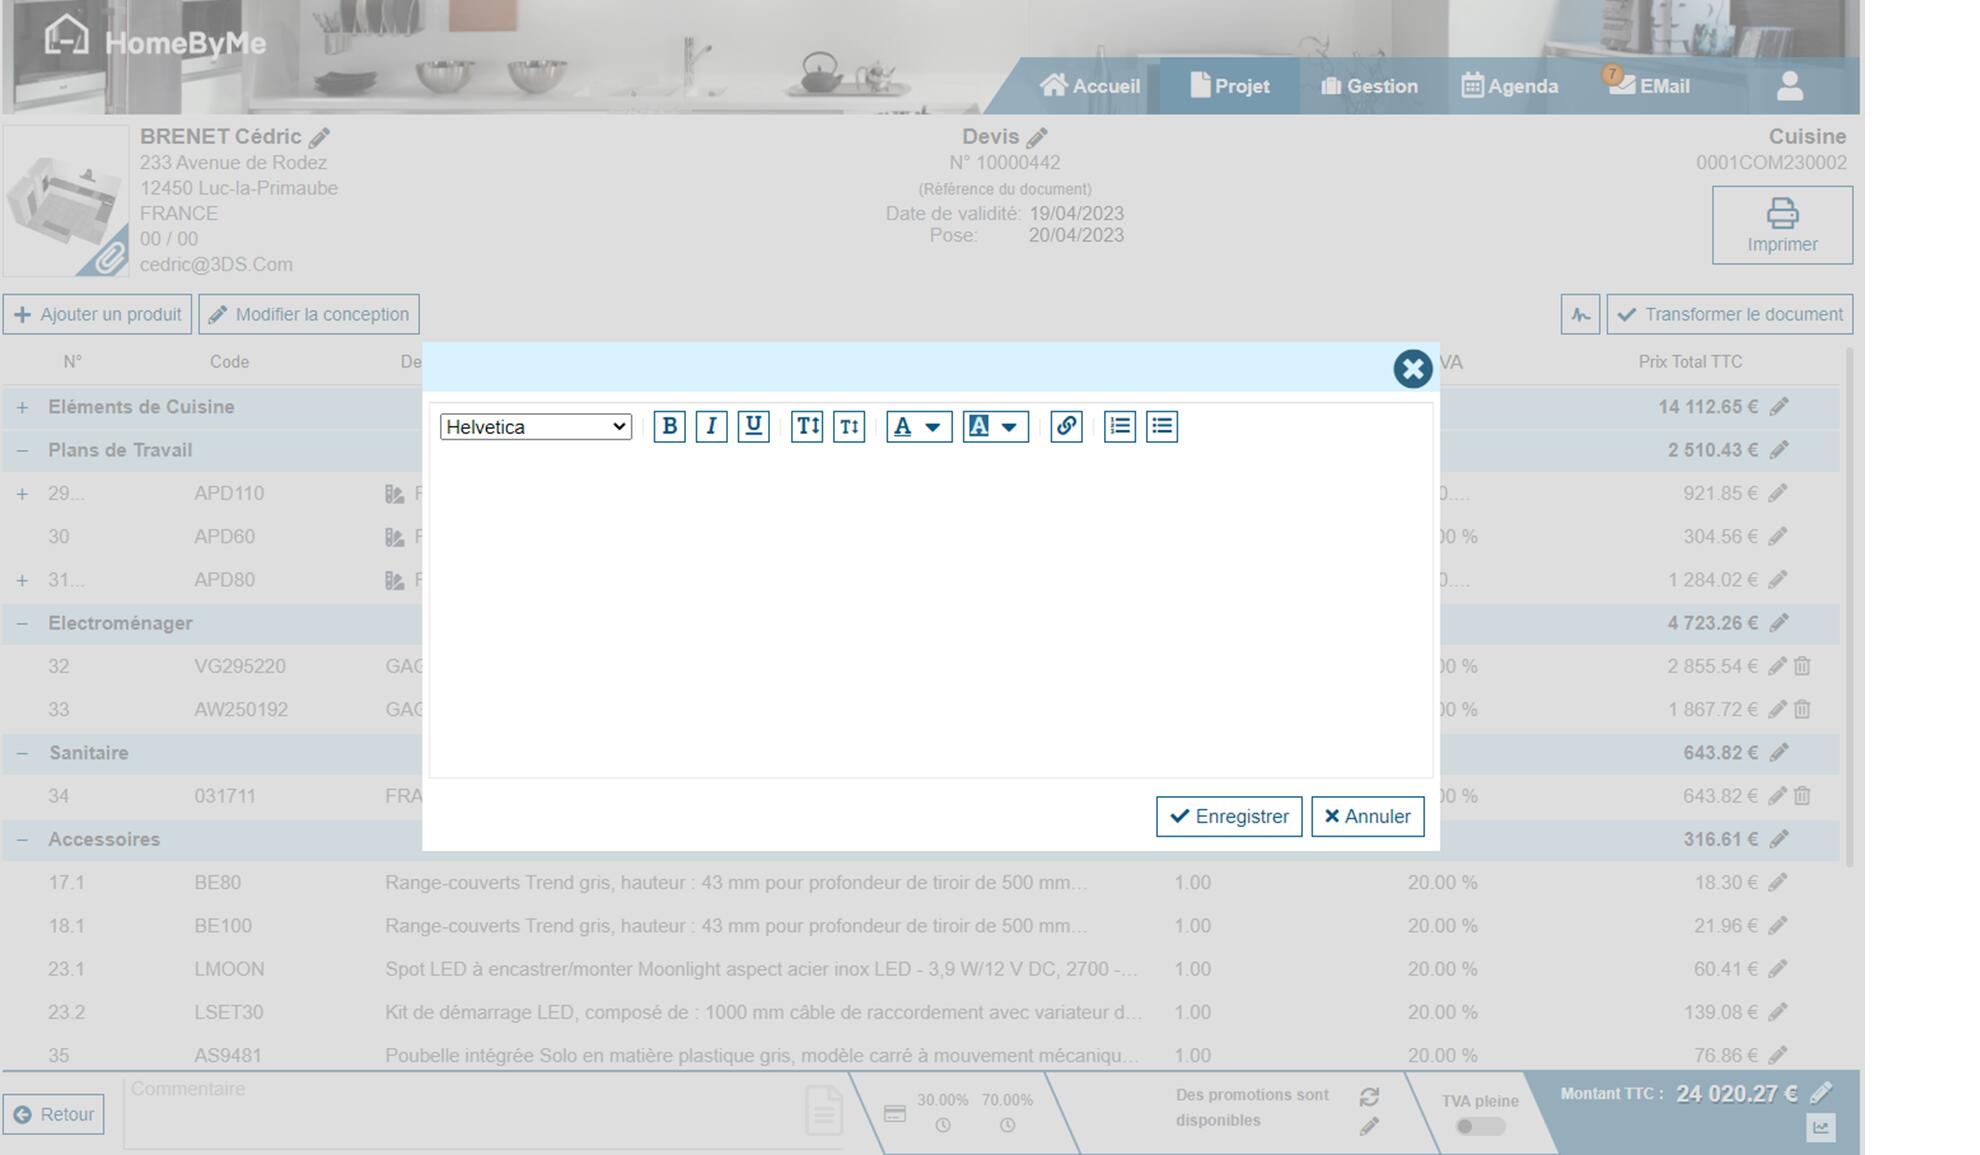
Payment terms
The end-user can define its document payment terms by clicking on the sum-up displayed at the bottom of the document.
Applying a promotion
A promotion can be created and configurated in Retail Operation to suggest promotions to be applicated to the document.
A promotion can be applied from two places: in the document footer or in the category/foot discount screen.

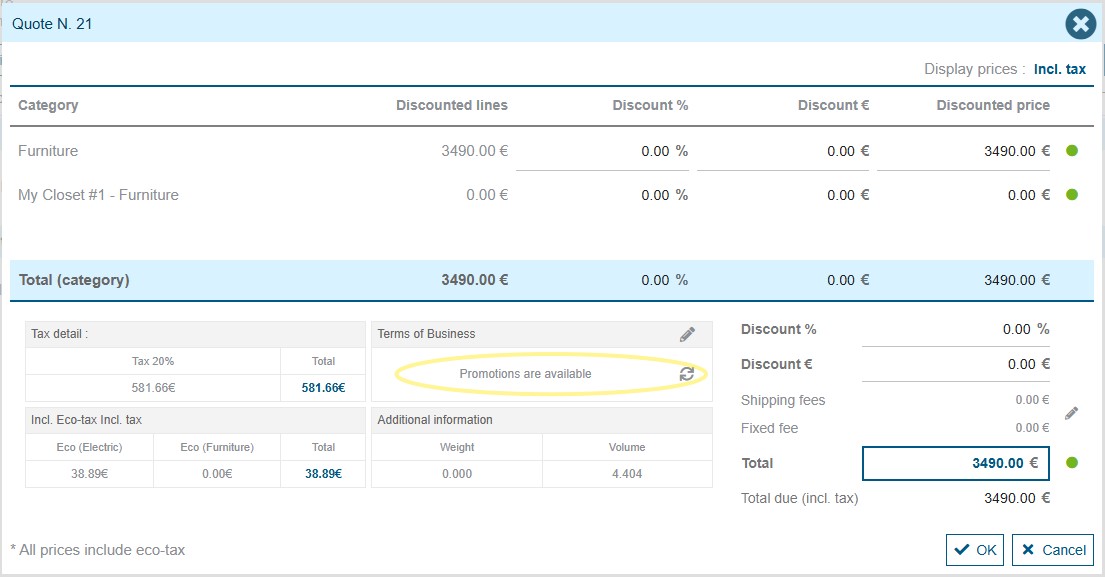
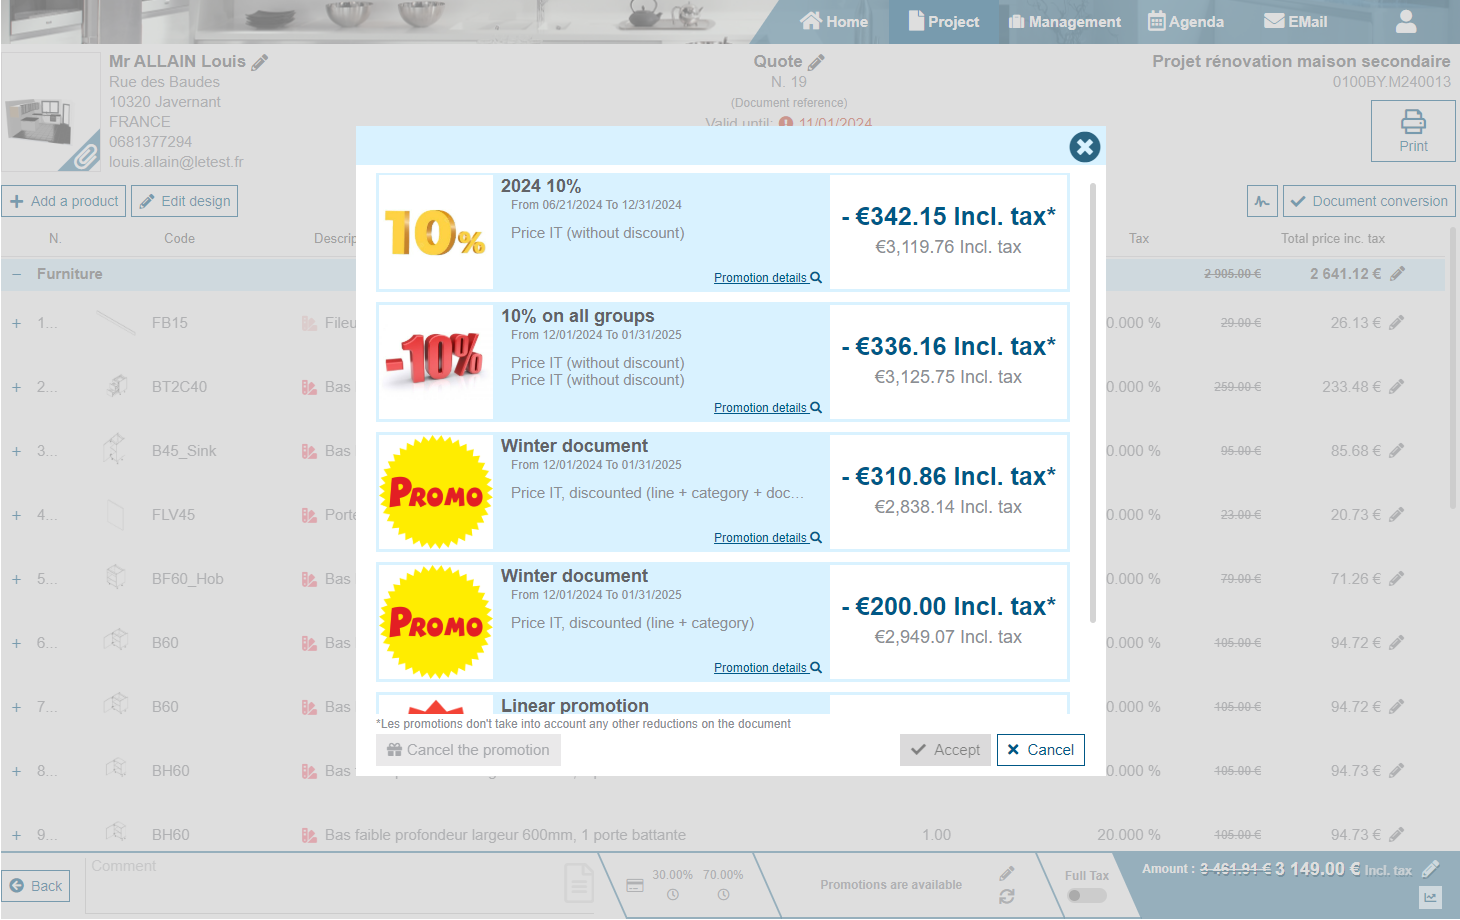
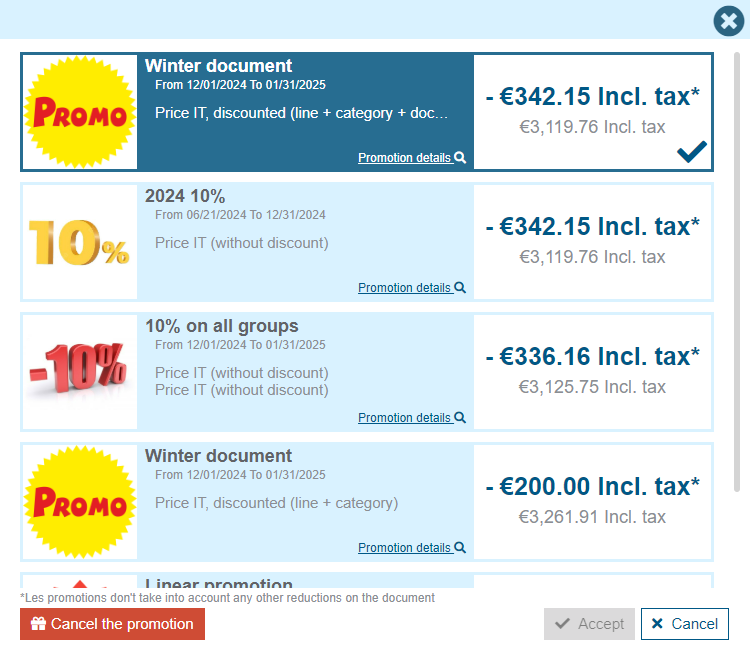
When clicking on the pen  a list of all applicable promotions appears and the user can select the one to be applied.
This screen displays the name, the method of application, the amount of the promotional discount and the total price the document will have if the promotion is applied.
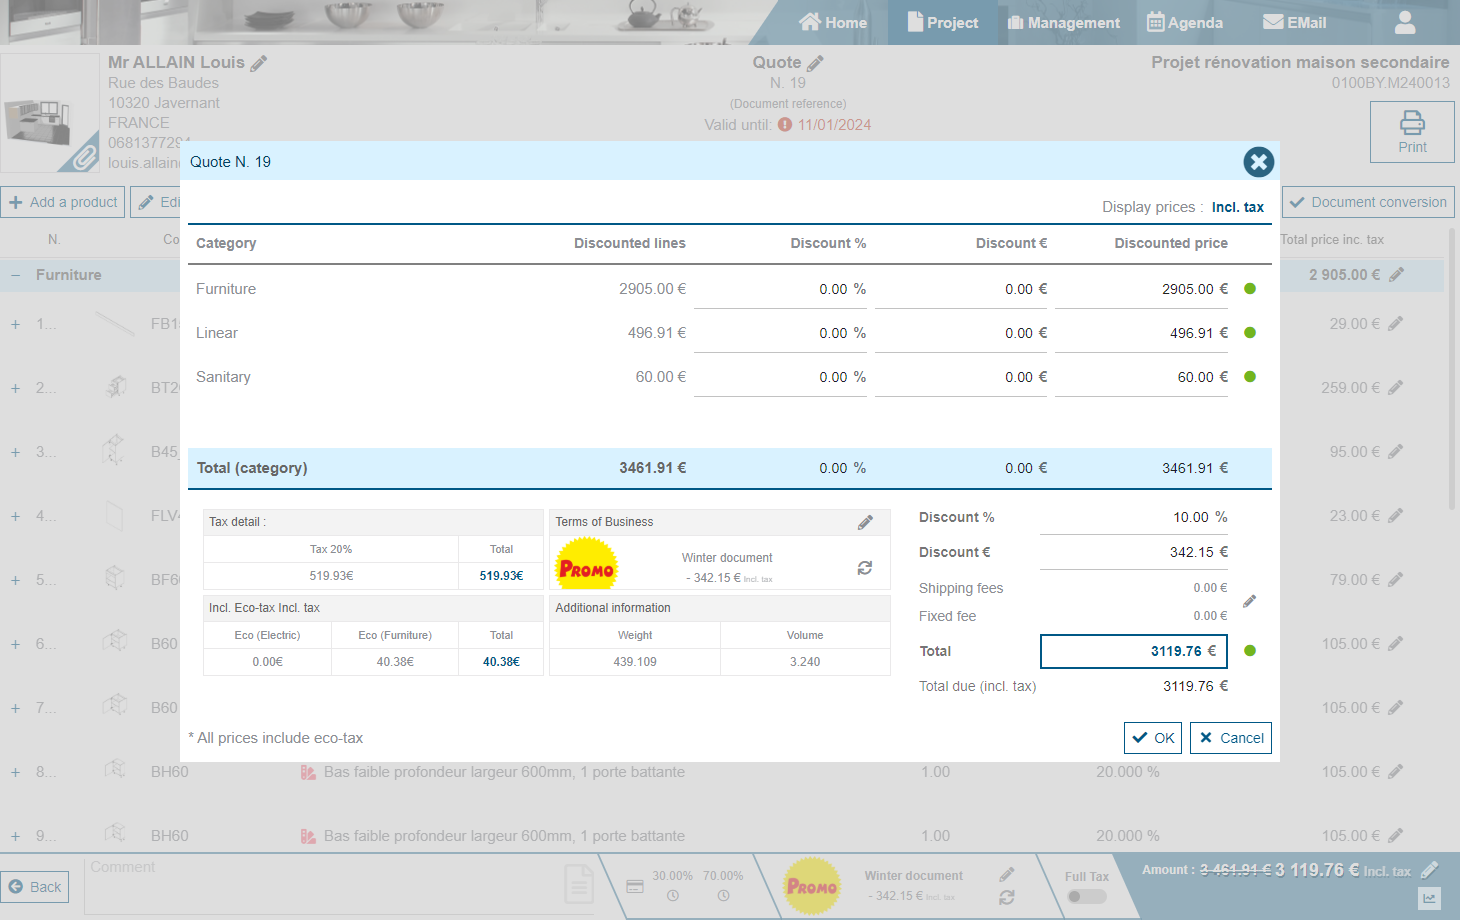
When the promotion is applied, the informations relating to the promotion, the logo, the name and the amount, can be visible in the document.
There is 3 actions on this informations panel :
- Clicking on the pen to reopen the promotions list.
- Clicking on the logo, the name or the amount open the details of the promotion.
- Clicking on the refresh icon
 , refresh the promotion.
To cancel an active promotion, open the list of the applicable promotion by cliking on the pen. When the list is openned, click on the red button "Cancel the promotion".
To replace an active promotion, open the same form, select another promotion and click on the button "Accept".
Depending on the promotion settings, manual discounts may be cancelled before the promotion is applied.
For more details see how a promotion is applied
Blocks evaluation
If your Company uses Block definitions, you can find an additional functionnality on the bottom of your Document, allowing you to choose the most relevant Block for this Document.

This functionality will only be displayed under certain conditions:
- At least one active Block definition exists on your system (cf. Blocks configuration)
- At least one document line is assigned a
RangeCodeas well as aMerchandise group code.
The displayed pop-up window allows you to compare the available Blocks and Additional Packs and eventually choose ones in order to apply specific discounts to the sets of document lines matching these Block conditions. The list is sorted in order to offer you the most interesting Block (i.e. the one giving the highest benefit on purchase prices) in priority.
Selecting a Block and/or an Additional pack displays on the right of the screen a sum-up of the price changes that will be applied to your Document.
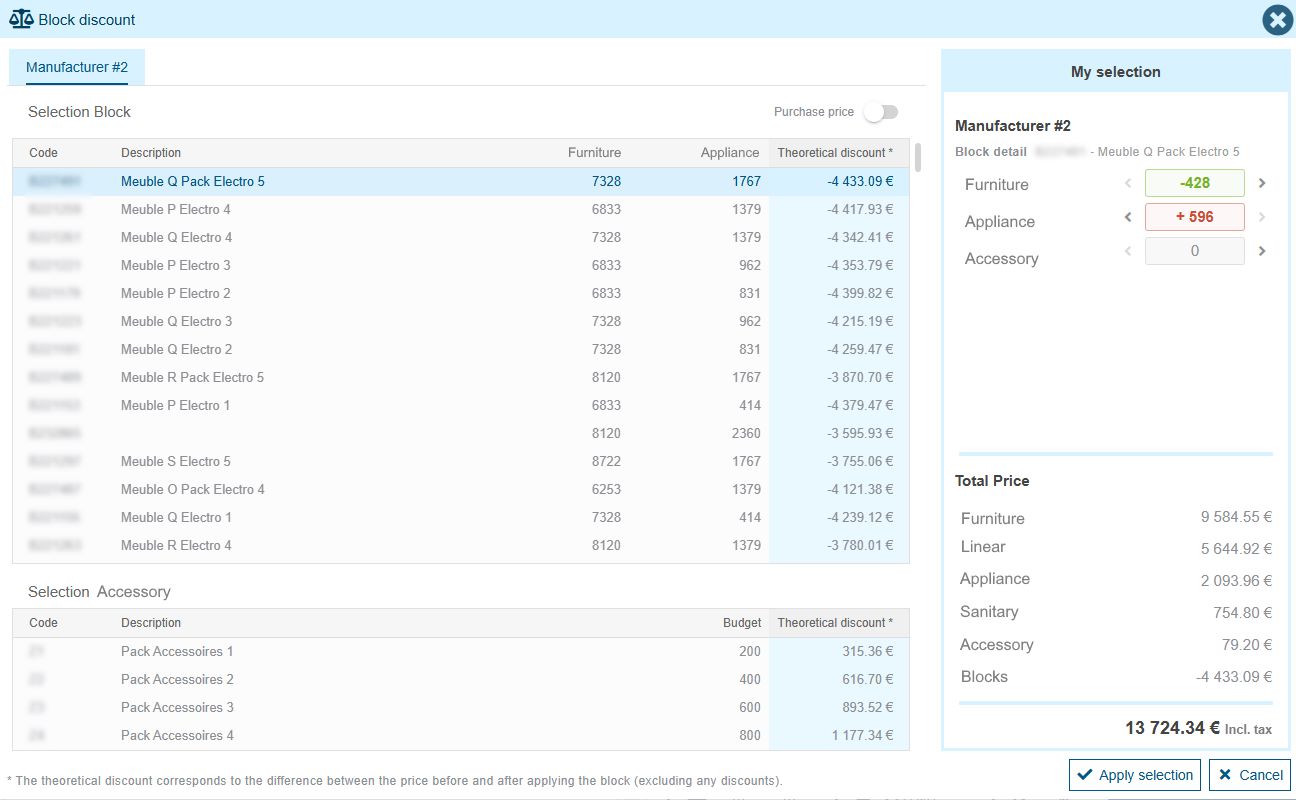
Navigation arrows < > around every Merchandise group of the selected Block & Pack allow you to directly switch to the Block with same budgets for other Merchandise groups and immediate lower/higher budget for the selected Merchandise group. They allow you to easily compare the benefits of chosing for example a higher budget instead of having a budget overrun. Depending on your coefficients and document amounts, one may be more interesting than the other one. These arrows are disabled when no similar Block exist for your other budgets.
When applying the selected options, several new document lines may be added to your document:
- One for each Block and/or Additional Pack, indicating its price
- Eventual add-ons corresponding to the Discounts applied to each related Merchandise group

VAT type
When the circumstances allow the seller to apply a reduced VAT rate to certain items of his document, he has the ability to click on the dedicated button on the bottom of the document screen in order to automaticaly switch between full VAT and reduced VAT for all products of the document supporting different VAT rates.
Totals & Margin
Totals
Clicking on the Document price on the bottom-right of the screen pops-up a summary dialog:
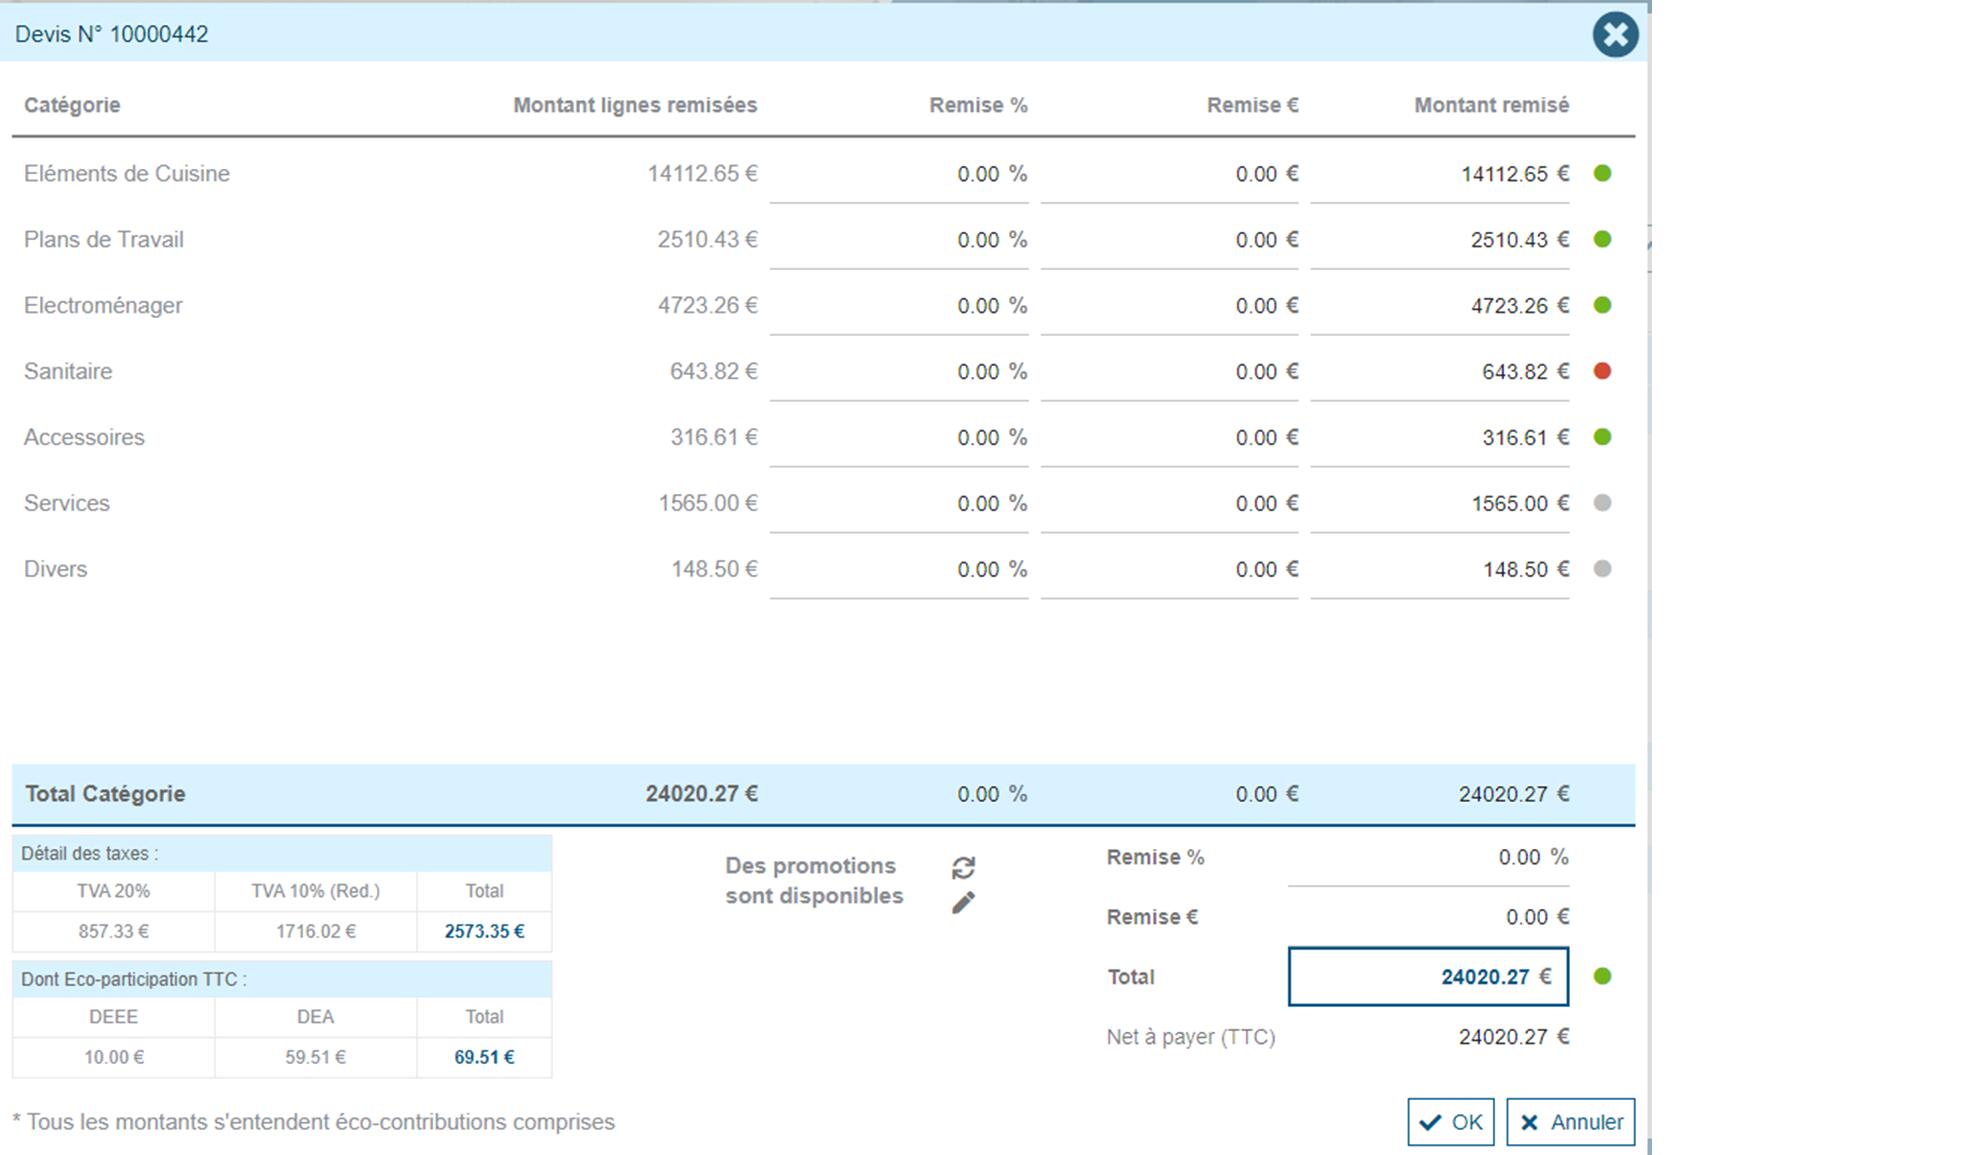
Here the end-user can find all important totals:
- Total amounts and discounts by product groupings (cf. Classification)
- Taxes and eco-fees totals
- Eventually total weight and volume
- Eventually the selected promotion
- Additional costs and potential global discount
- Margin indicators
These allow the end-user to eventually negociate discounts with his customers while making sure that his margins remain sufficient.
Applying installation and service
Installation and/or Service additional costs - when set - can be added to the document (cf. Installation & Service).
Additional fees
It is possible - when set - to apply eventual additional fees, such as Shipping fee and/or Fixed fee.
Margin
The document margin is accessible in several places in the document, depending on the user's rights:
Next to the footer of the document
The Document global margin percentage and amount are potentially combined in a global codified string:

- The percentage (multiplied by 100 and rounded) is displayed on the left of the codified text: here "4686" stands for 46.86 %
- The amount (multiplied by 100 and rounded) is displayed on the right of the codified text: here "184367" stands for 1843.67 €
Clicking on the icon on the right of the codified string pop-ups a quick tooltip box indicating those same values in a readable way:

On the discount entry screen
Colored dots are displayed next to each product category and next to the total of the document, indicating the intermediate and global margins. Moving the mouse over the indicator pops-up a quick tooltip box indicating the corresponding Margin amount and percentage as well as the related Purchase price used for the computation.
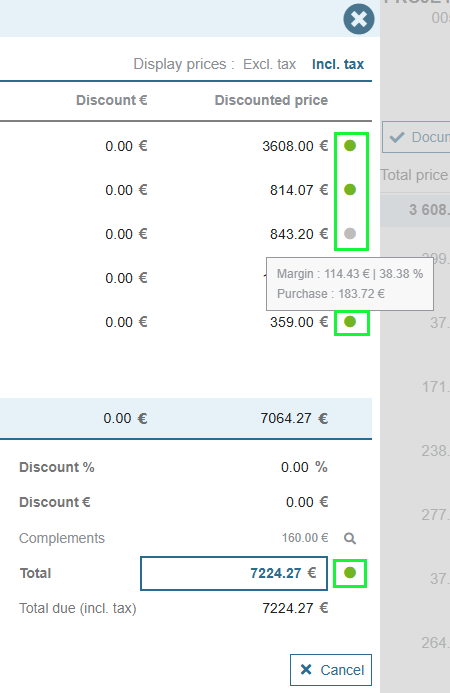
Several levels of alert concerning your document margins can be defined by Store and Customer type (cf. Store configuration):
- Warning rate: indicates a minimum profit rate before entering a medium level of criticity
- cf. PercentMarginWarning configuration parameter for Individual customer type
- cf. PercentMarginWarningPro configuration parameter for Professional customer type
- Limit rate: indicates a minimum profit rate before entering a high level of criticity
- cf. PercentMarginLimit configuration parameter for Individual customer type
- cf. PercentMarginLimitPro configuration parameter for Professional customer type
Thus, the margin indicators can take several colors:
grey: the corresponding grouping only contains products from catalogs that are ignored in the margin computation (cf. Catalog detail).
green: the corresponding profit rate is superior or equal to the defined Warning rate.
orange: the corresponding profit rate is inferior to the defined Warning rate but still superior or equal to the defined Limit rate.
red: the corresponding profit rate is inferior to the defined Limit rate.